Micoo
Micoo (repository is here) is a pixel based screenshots comparison solution for visual regression test, some characters Micoo provides:
- a web application, for inspecting test results, making visual mismatch decision and maintain baseline build,
- an engine service, for comparing the latest screenshots against baseline screenshots, based on pixel difference,
- a methodology, about how to do visual regression test with service,
- quick local setup and server side deployment with Docker Compose,
- basic authentication with a passcode and API key,
Micoo does NOT:
- take screenshots from your SUT application,
- process screenshots before doing visual comparison,
- provide Email notification for comparison mismatch,
- provide user management to distinguish
teams,
So, what Micoo targets at is the most stable and straightforward function for comparing screenshots. Micoo is not, and probably, would never be a powerful thing, like JVM, but hope to be an always useful helper, like string.replace().
Installation
According to different purposes, there are 3 ways to launch Micoo as described below.
all the below steps require the project repository be cloned to your local, and all the commands are executed from the project’s root path.
before going to each launching steps, please first check the initialization section, otherwise you may lost your passcode.
launch with Docker images from Docker Hub
cd env
docker-compose up
Then Micoo should be ready at http://localhost:8123.
This is the simplest approach to launch Micoo. You can always use the images from Docker Hub, unless you would like to launch Micoo with your own source code changes.
launch with local source code
- create exchange directory
mkdir exchange
npm install
- containerize micoo-nginx service
cd env/nginx/containerize
./build-image.sh
- launch environment
cd env
docker-compose -f docker-compose.env.yaml up
- start micoo-dashboard service
cd dashboard
npm install
./run.sh
- start micoo-engine service
cd engine
npm install
./run.sh
Then Micoo should be ready at http://localhost:3001.
With above commands, it should successfully launch Micoo from the source code locally.
launch with local docker images
once you have debugged your code change successfully, you can containerize them locally:
- containerize micoo-nginx service
cd env/nginx/containerize
./build-image.sh
- containerize micoo-dashboard service
cd dashboard
./build-image.sh
- containerize micoo-engine service
cd engine
./build-image.sh
launch Micoo locally with your own docker images:
- launch all from local image
cd env
docker-compose -f docker-compose.local.yaml up
Then Micoo should be ready at http://localhost:8123.
The last thing, if you wish, you can publish your own docker images to your private or cloud registry, e.g. AWS ECR, to share with teams.
Server side deployment
Deploy Micoo on a server is almost the same things as above, the only additional work is to change the MICOO_FS_HOST_URL in the docker compose file. You should give the actual server hostname or IP address which can be accessible to your Micoo users.
Usage
Micoo service will be initialized firstly when you launch it.
Initialize Micoo service
The first time when you launched Micoo and visit http://localhost:8123, you will get the initialization page like below. In this page, Micoo
will give you the passcode for current service, BE CAREFUL, the passcode shown in initialization page can never been retrieved, you must save it
somewhere properly, if you forget your passcode, there is no way to let you log in to Micoo again except destroying current Micoo service and relaunching
a new one.

Click the Start button or refresh the current page (never do this before you have recorded you passcode) will lead you to the login page as below.

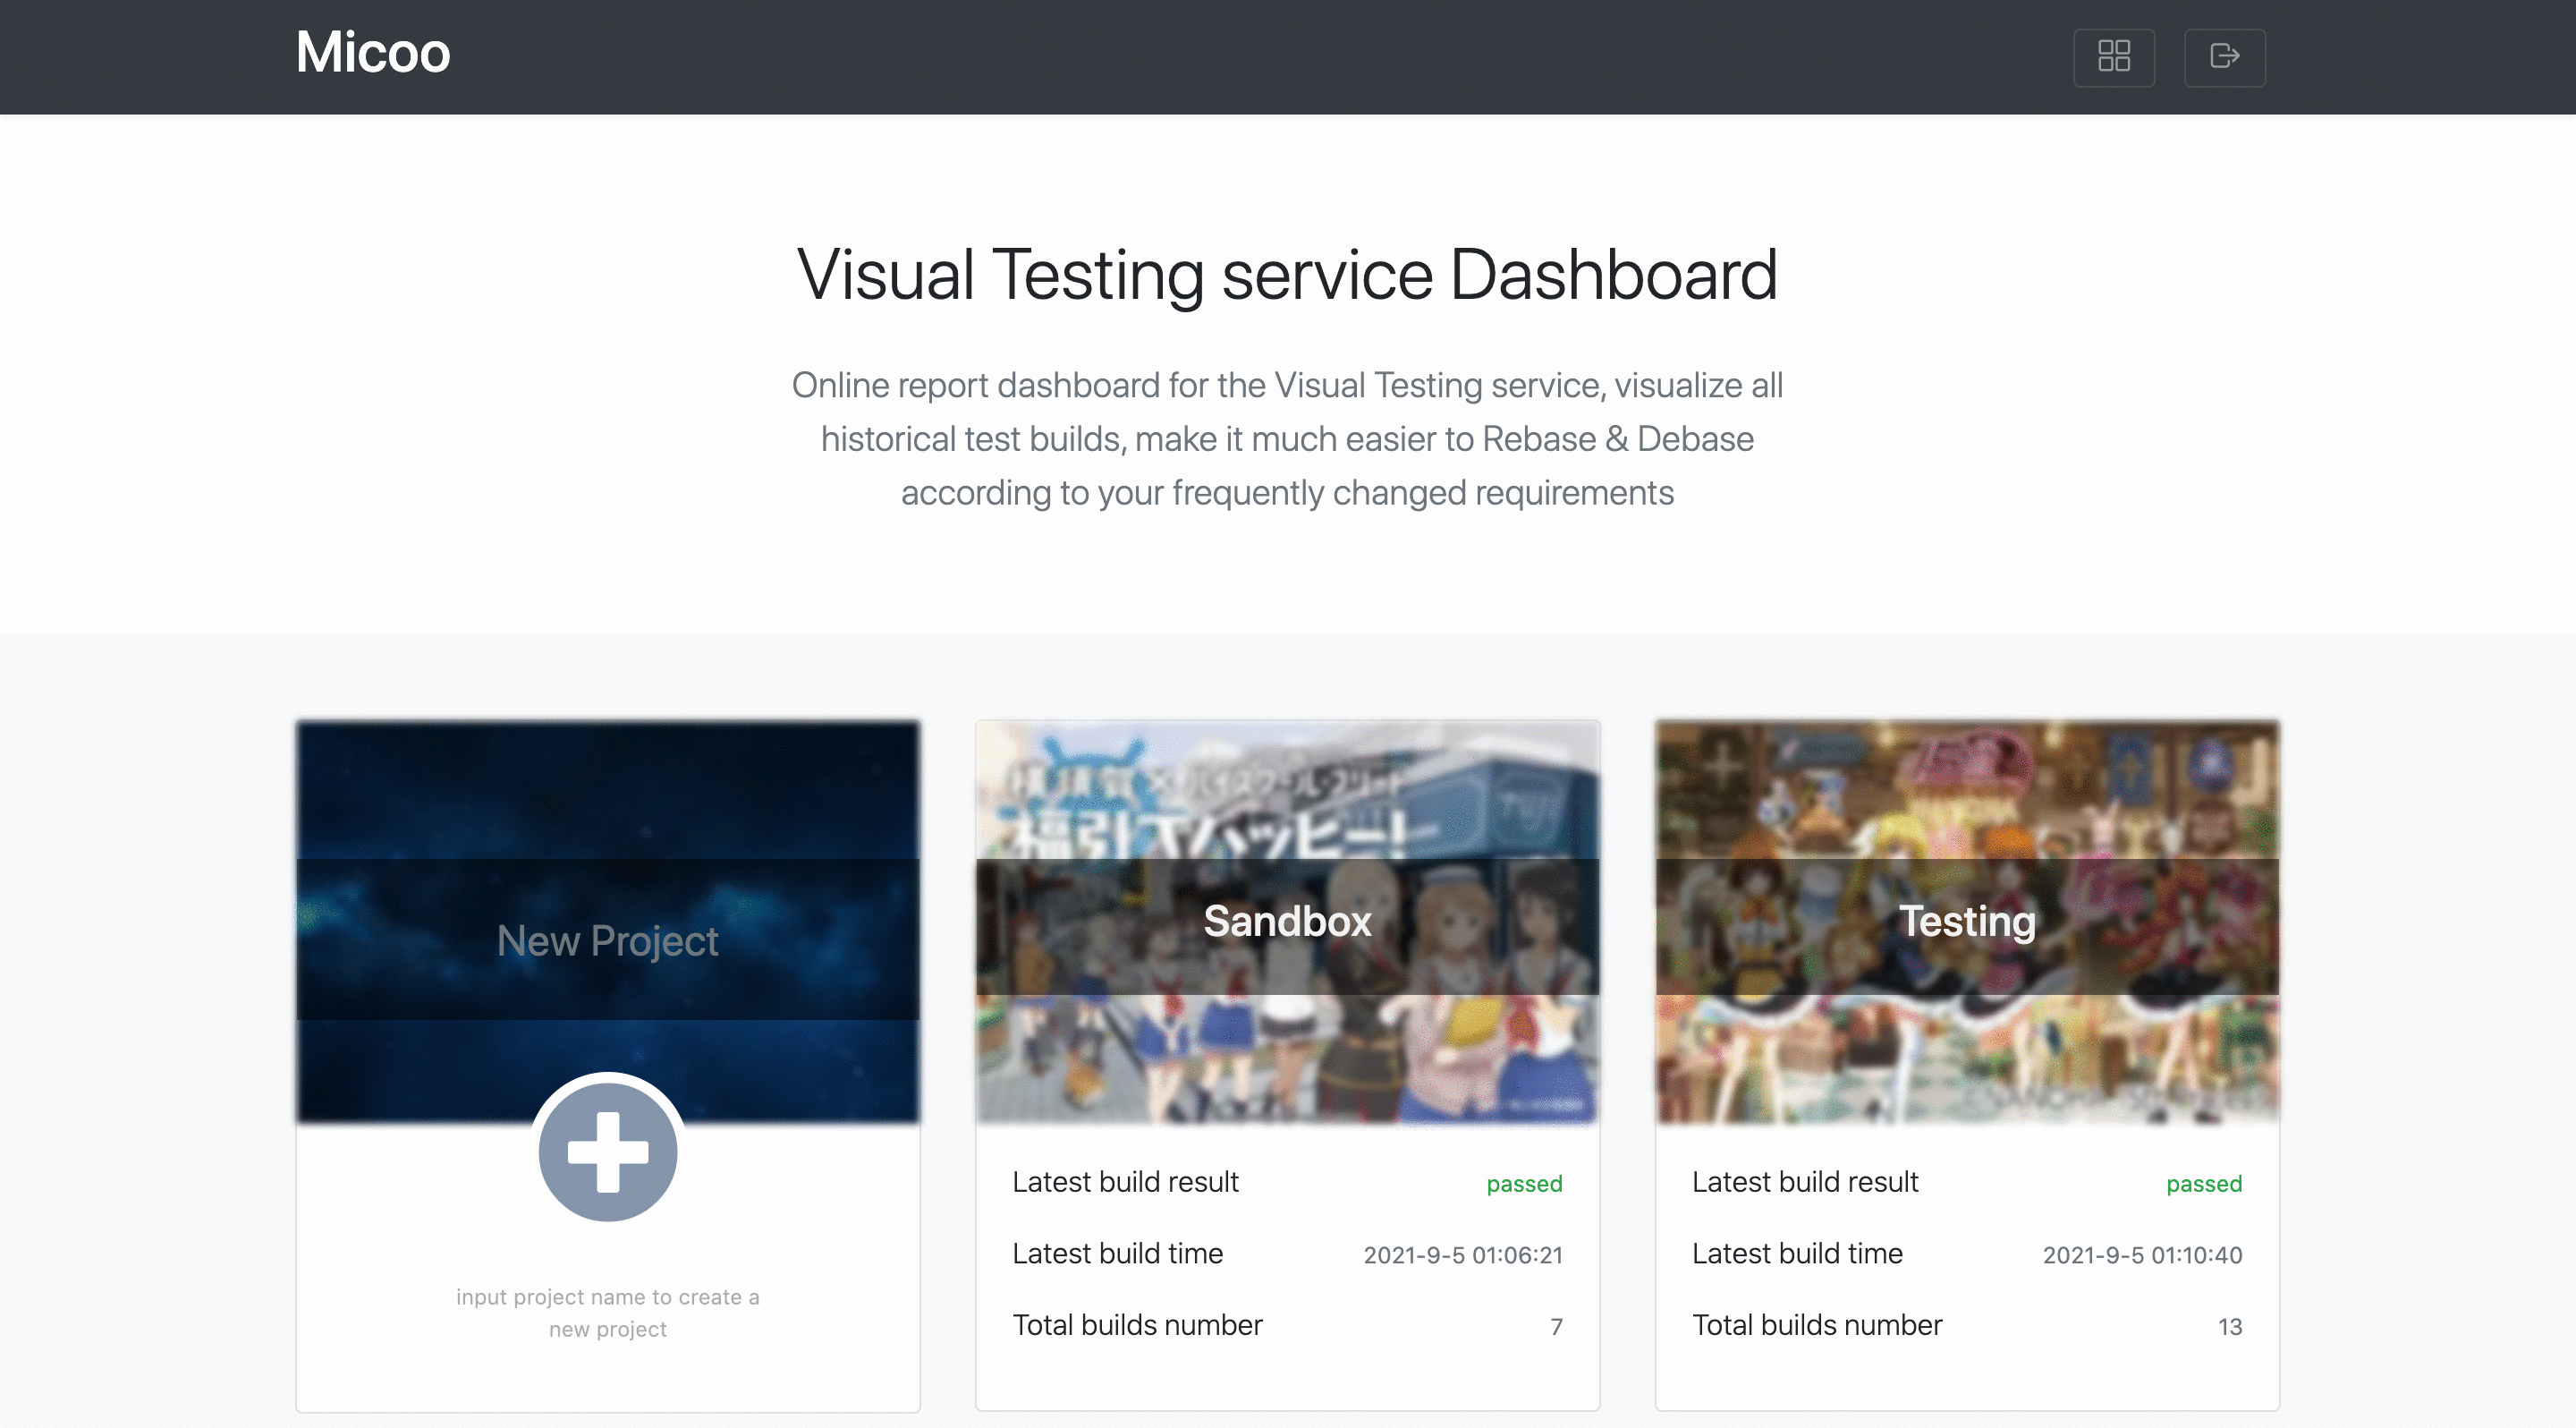
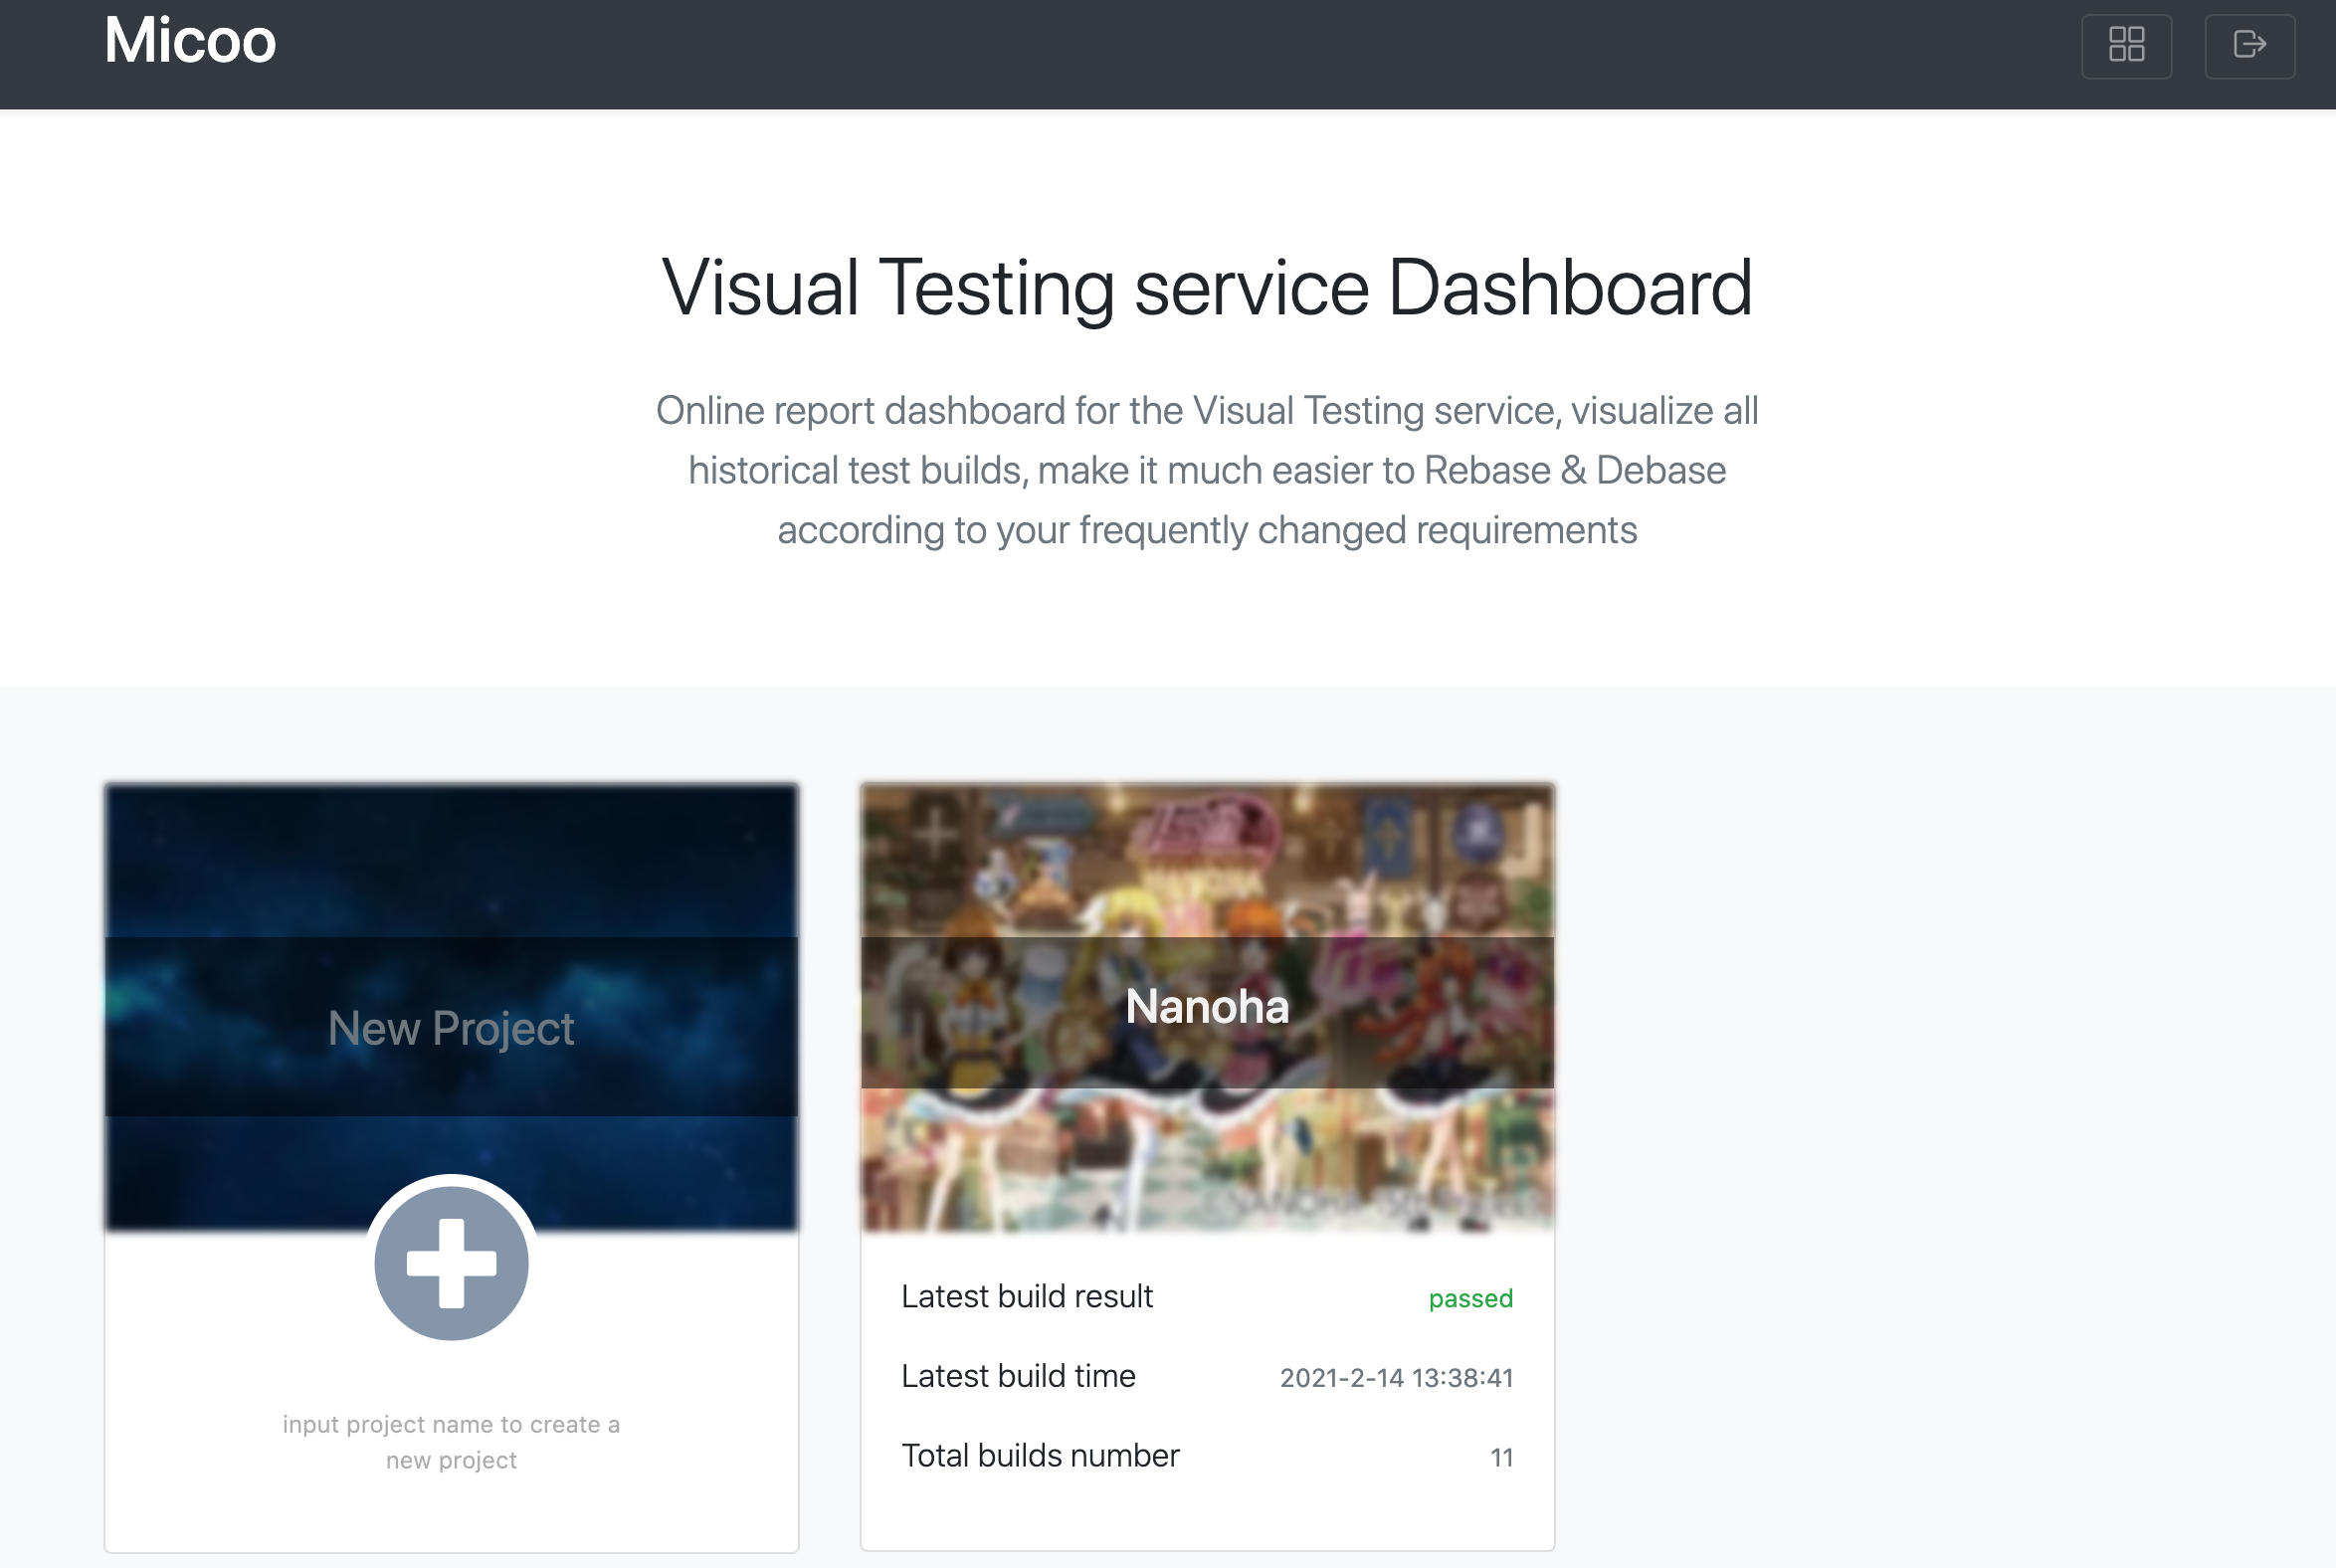
Log in with the passcode, then you could see its dashboard page like this
then, we can start our visual regression testing with Micoo.
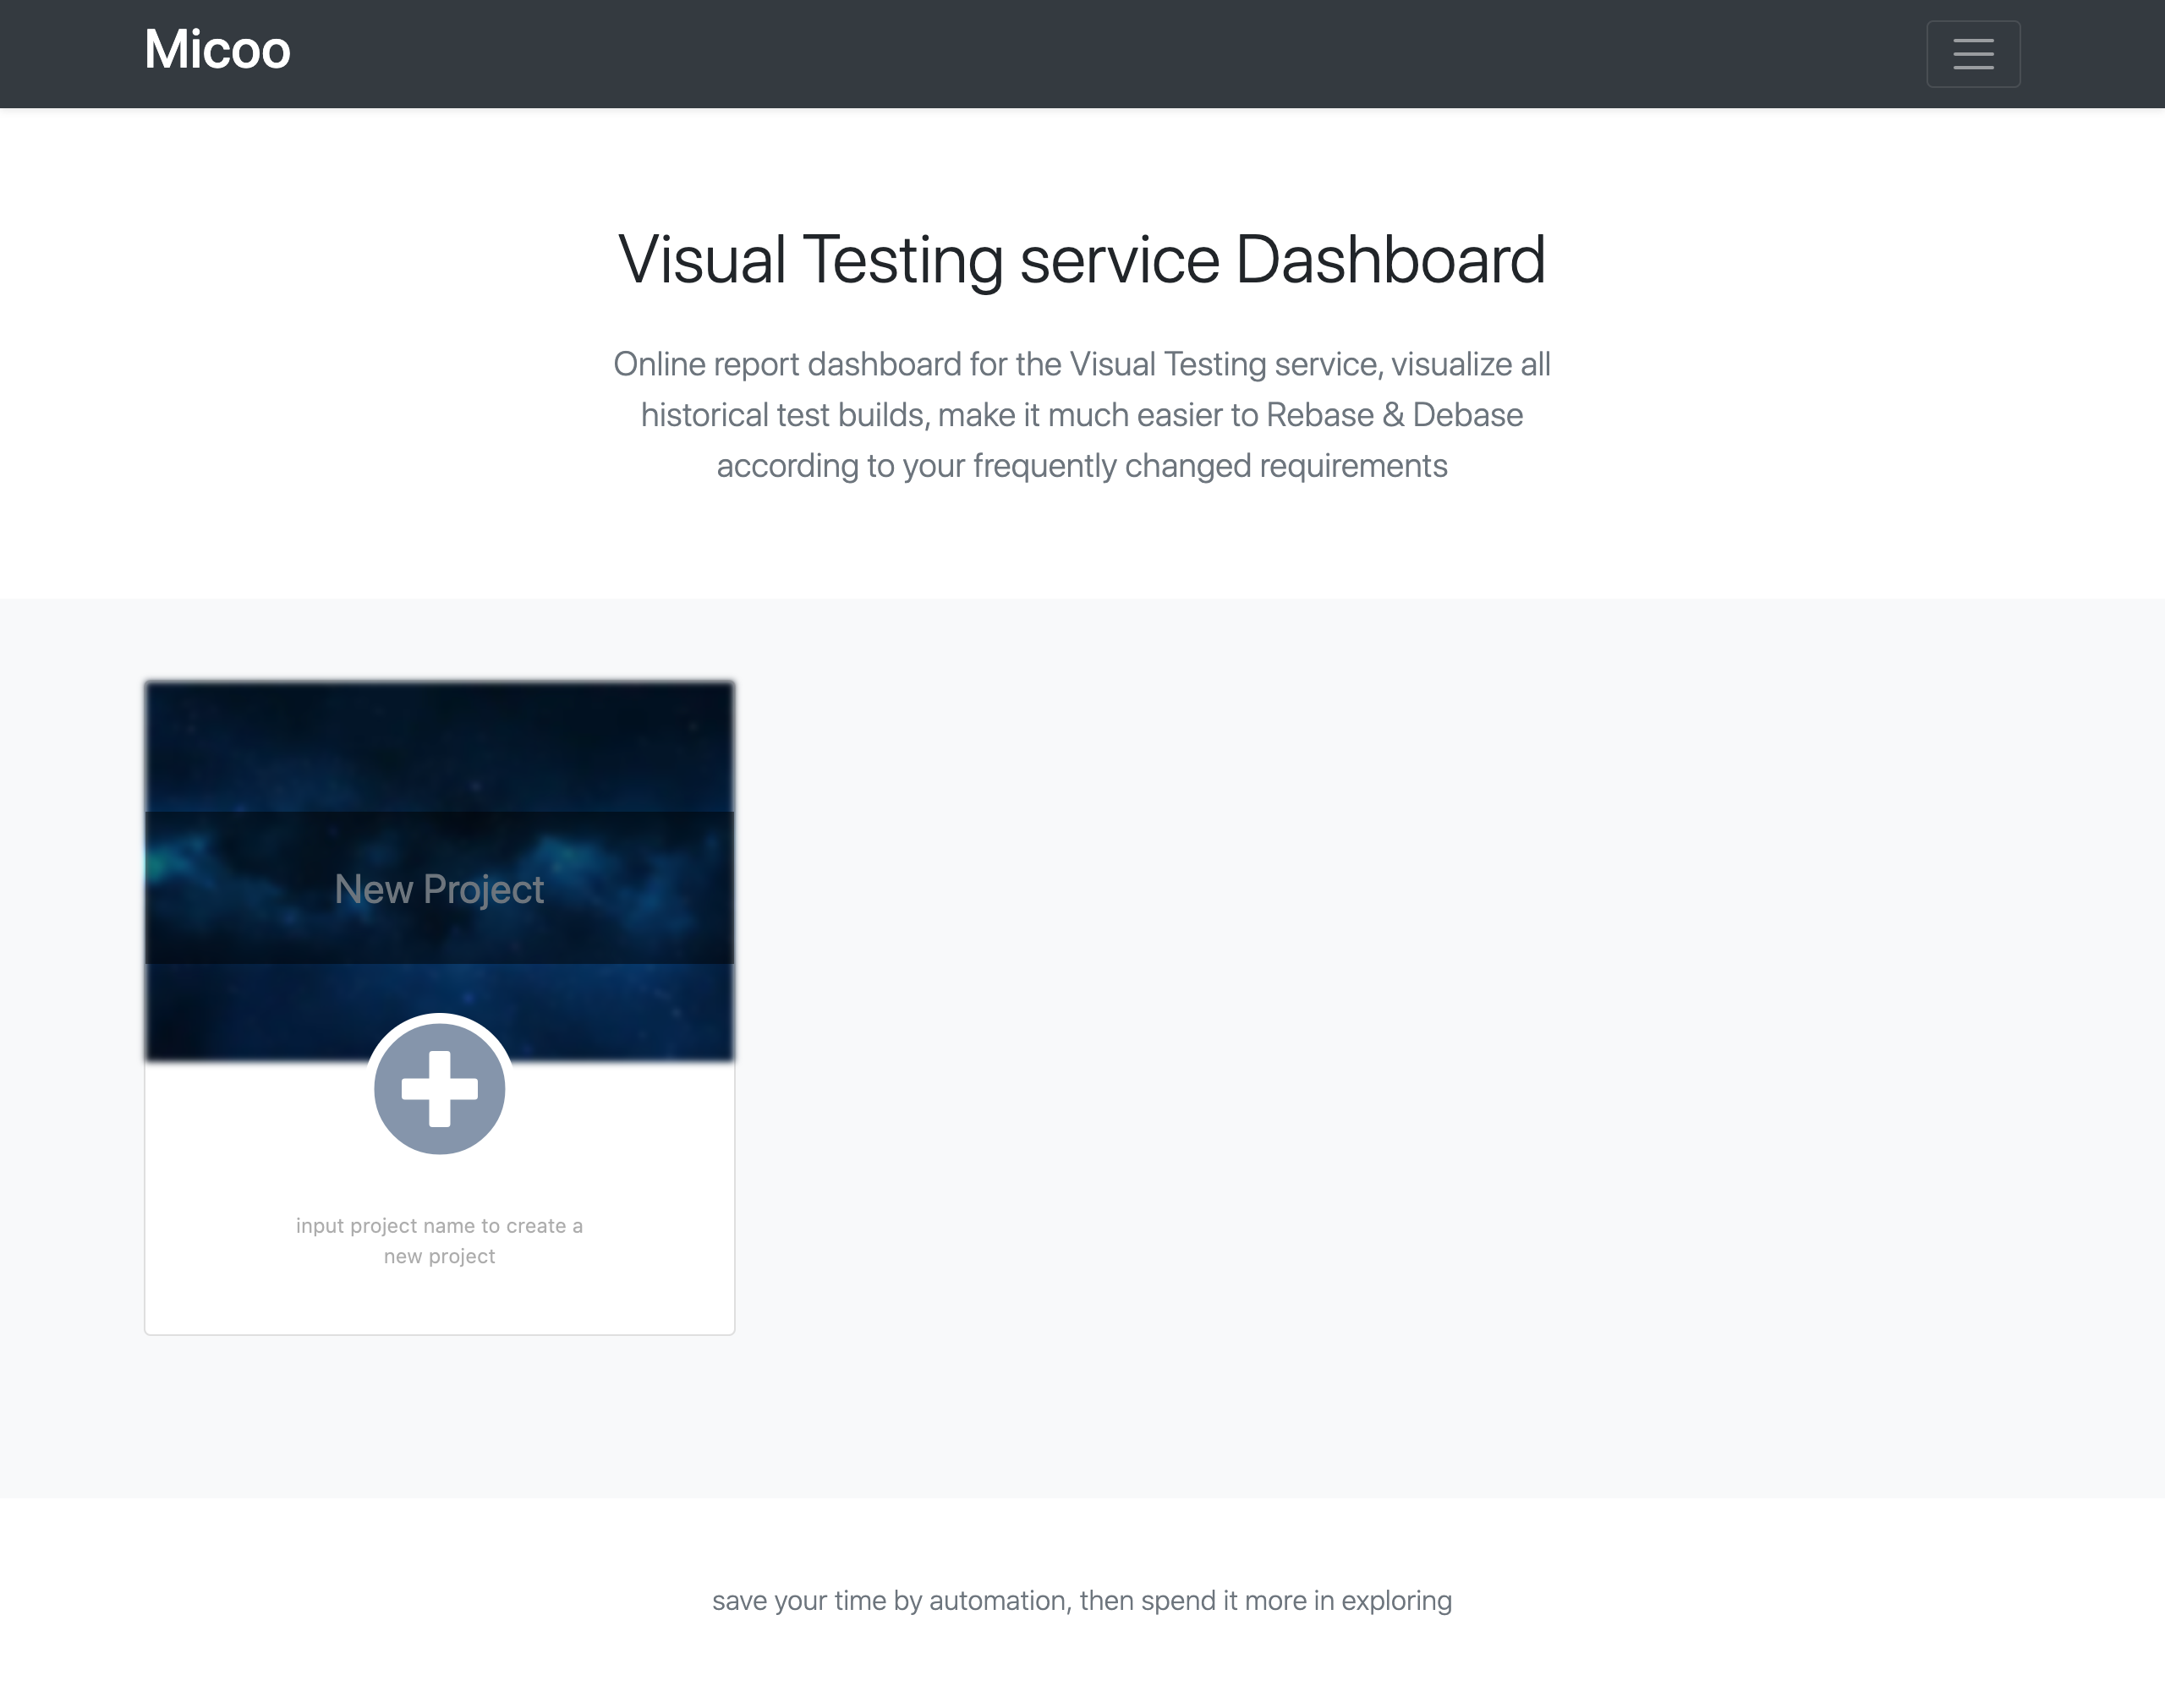
Create a Micoo project
First thing first, to create a new Micoo project, just input a project name and click the add button, you will get something like this
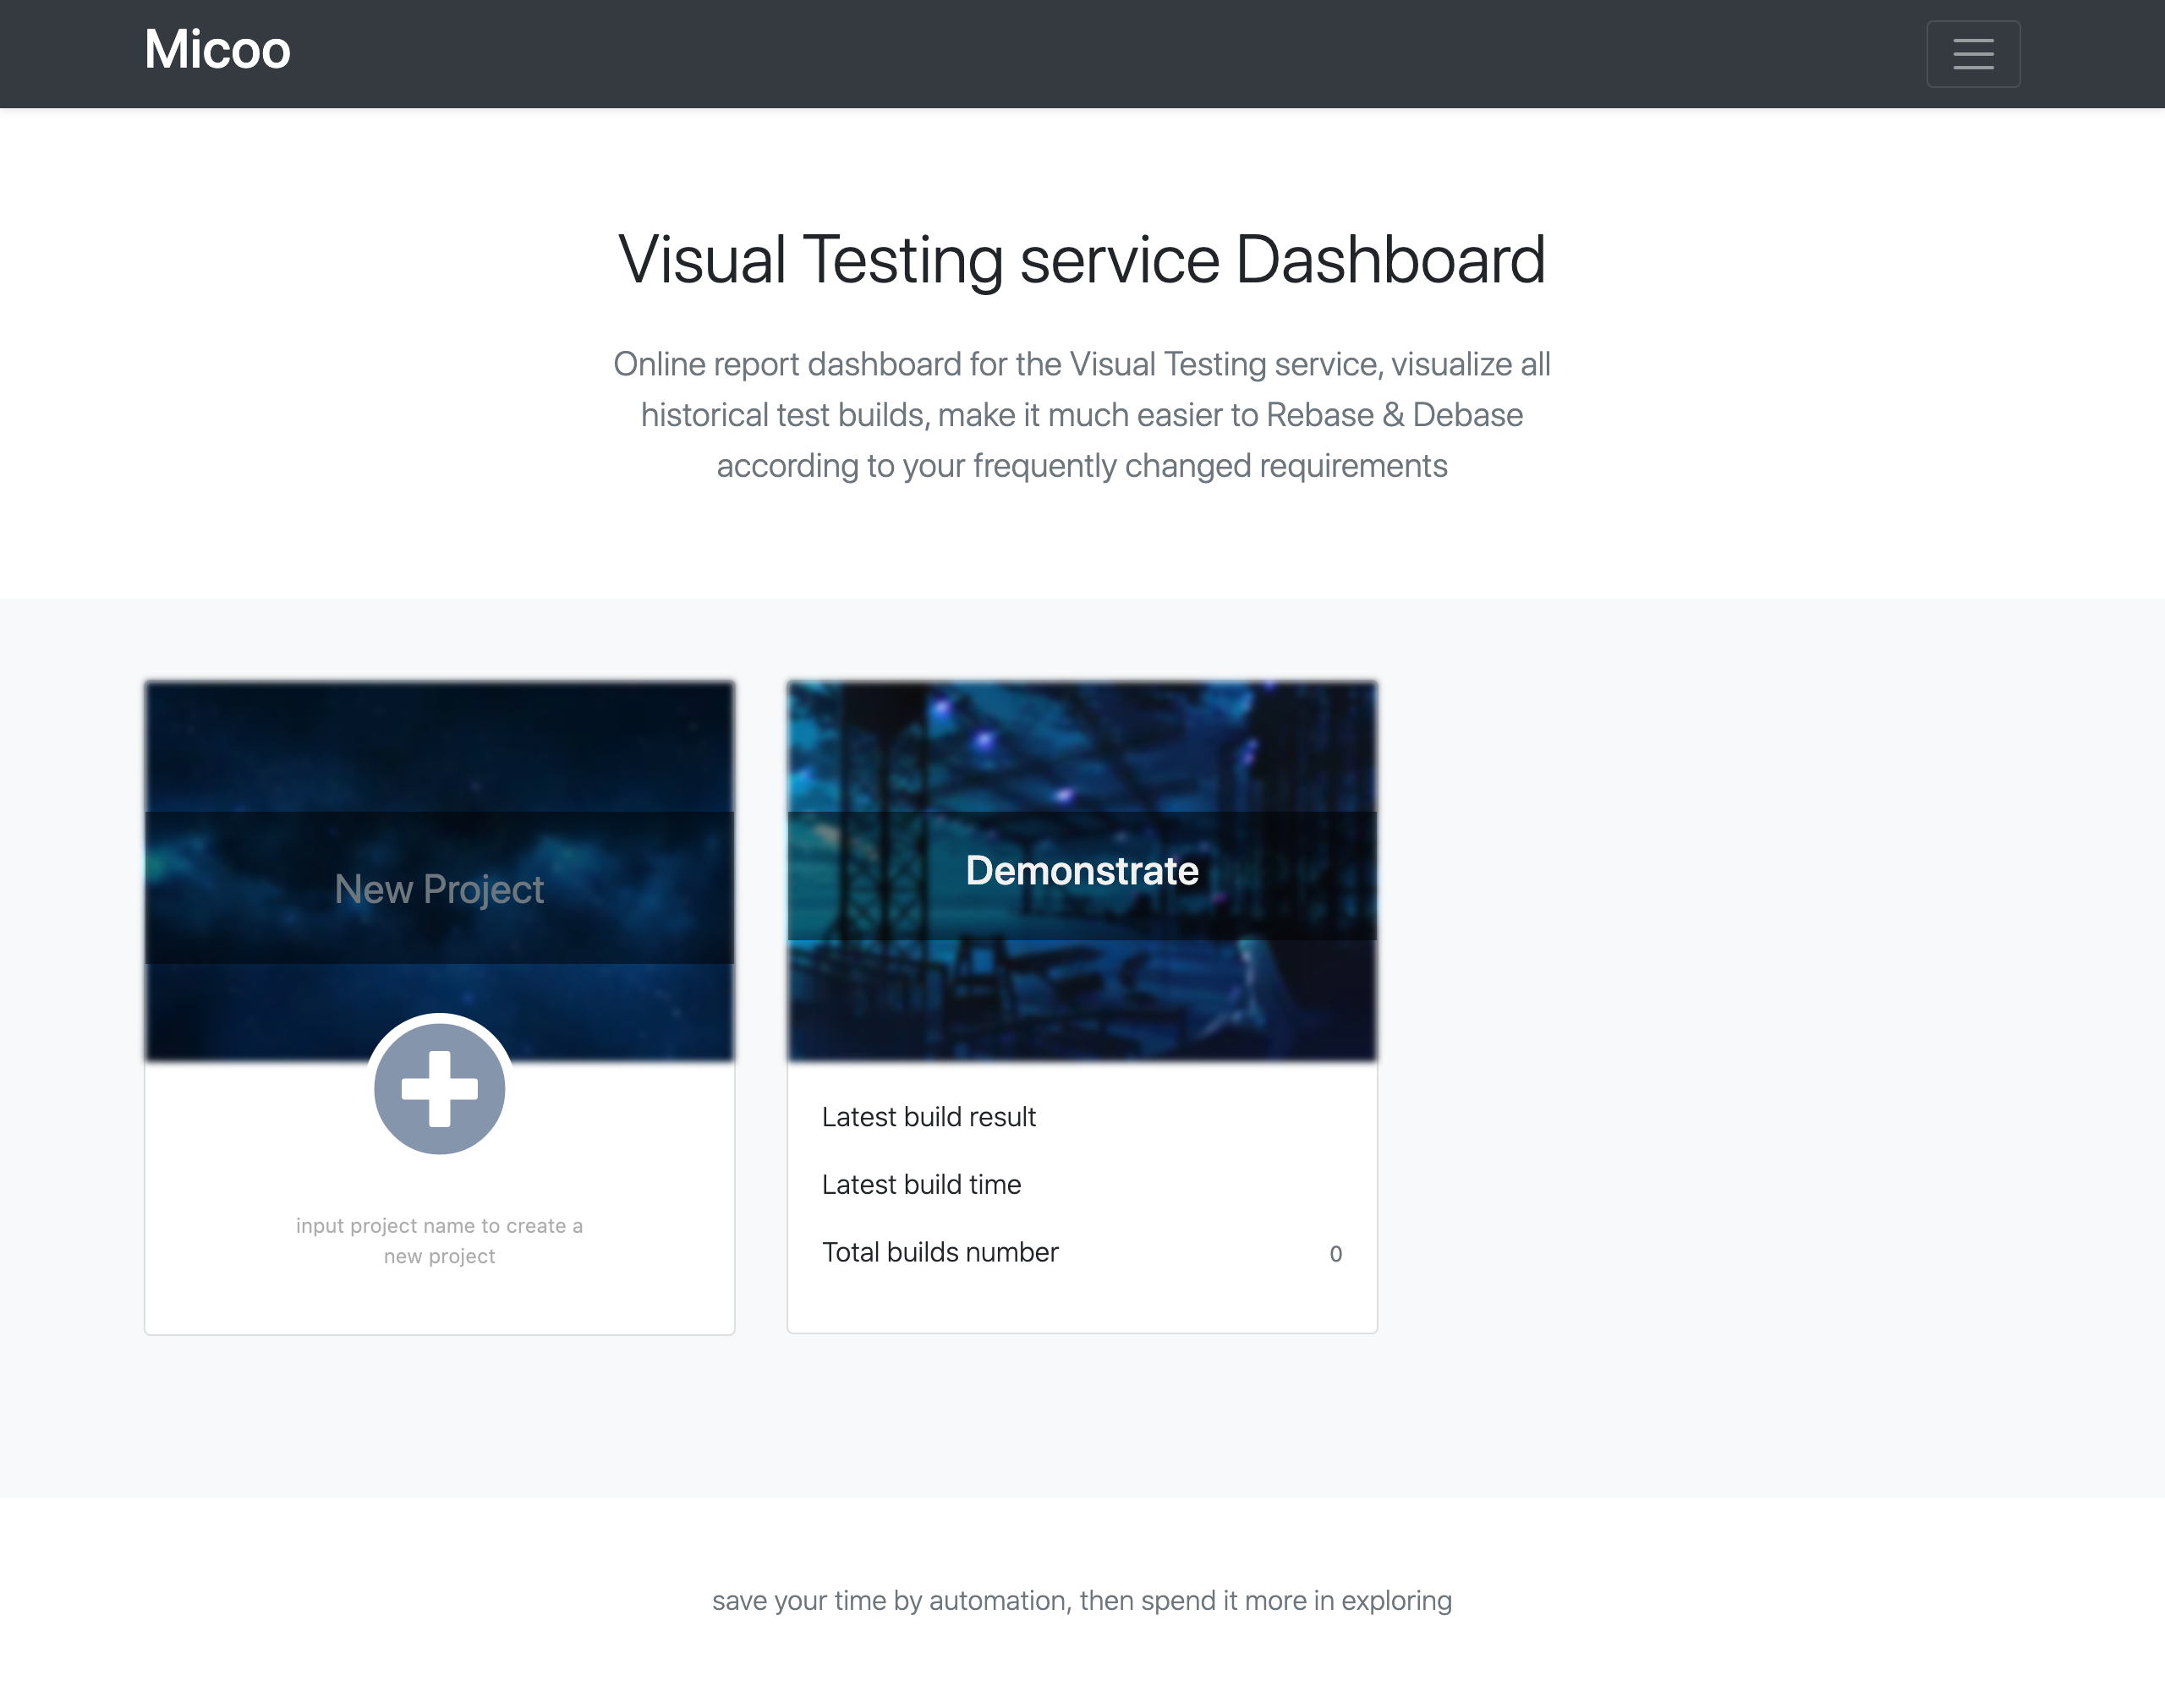
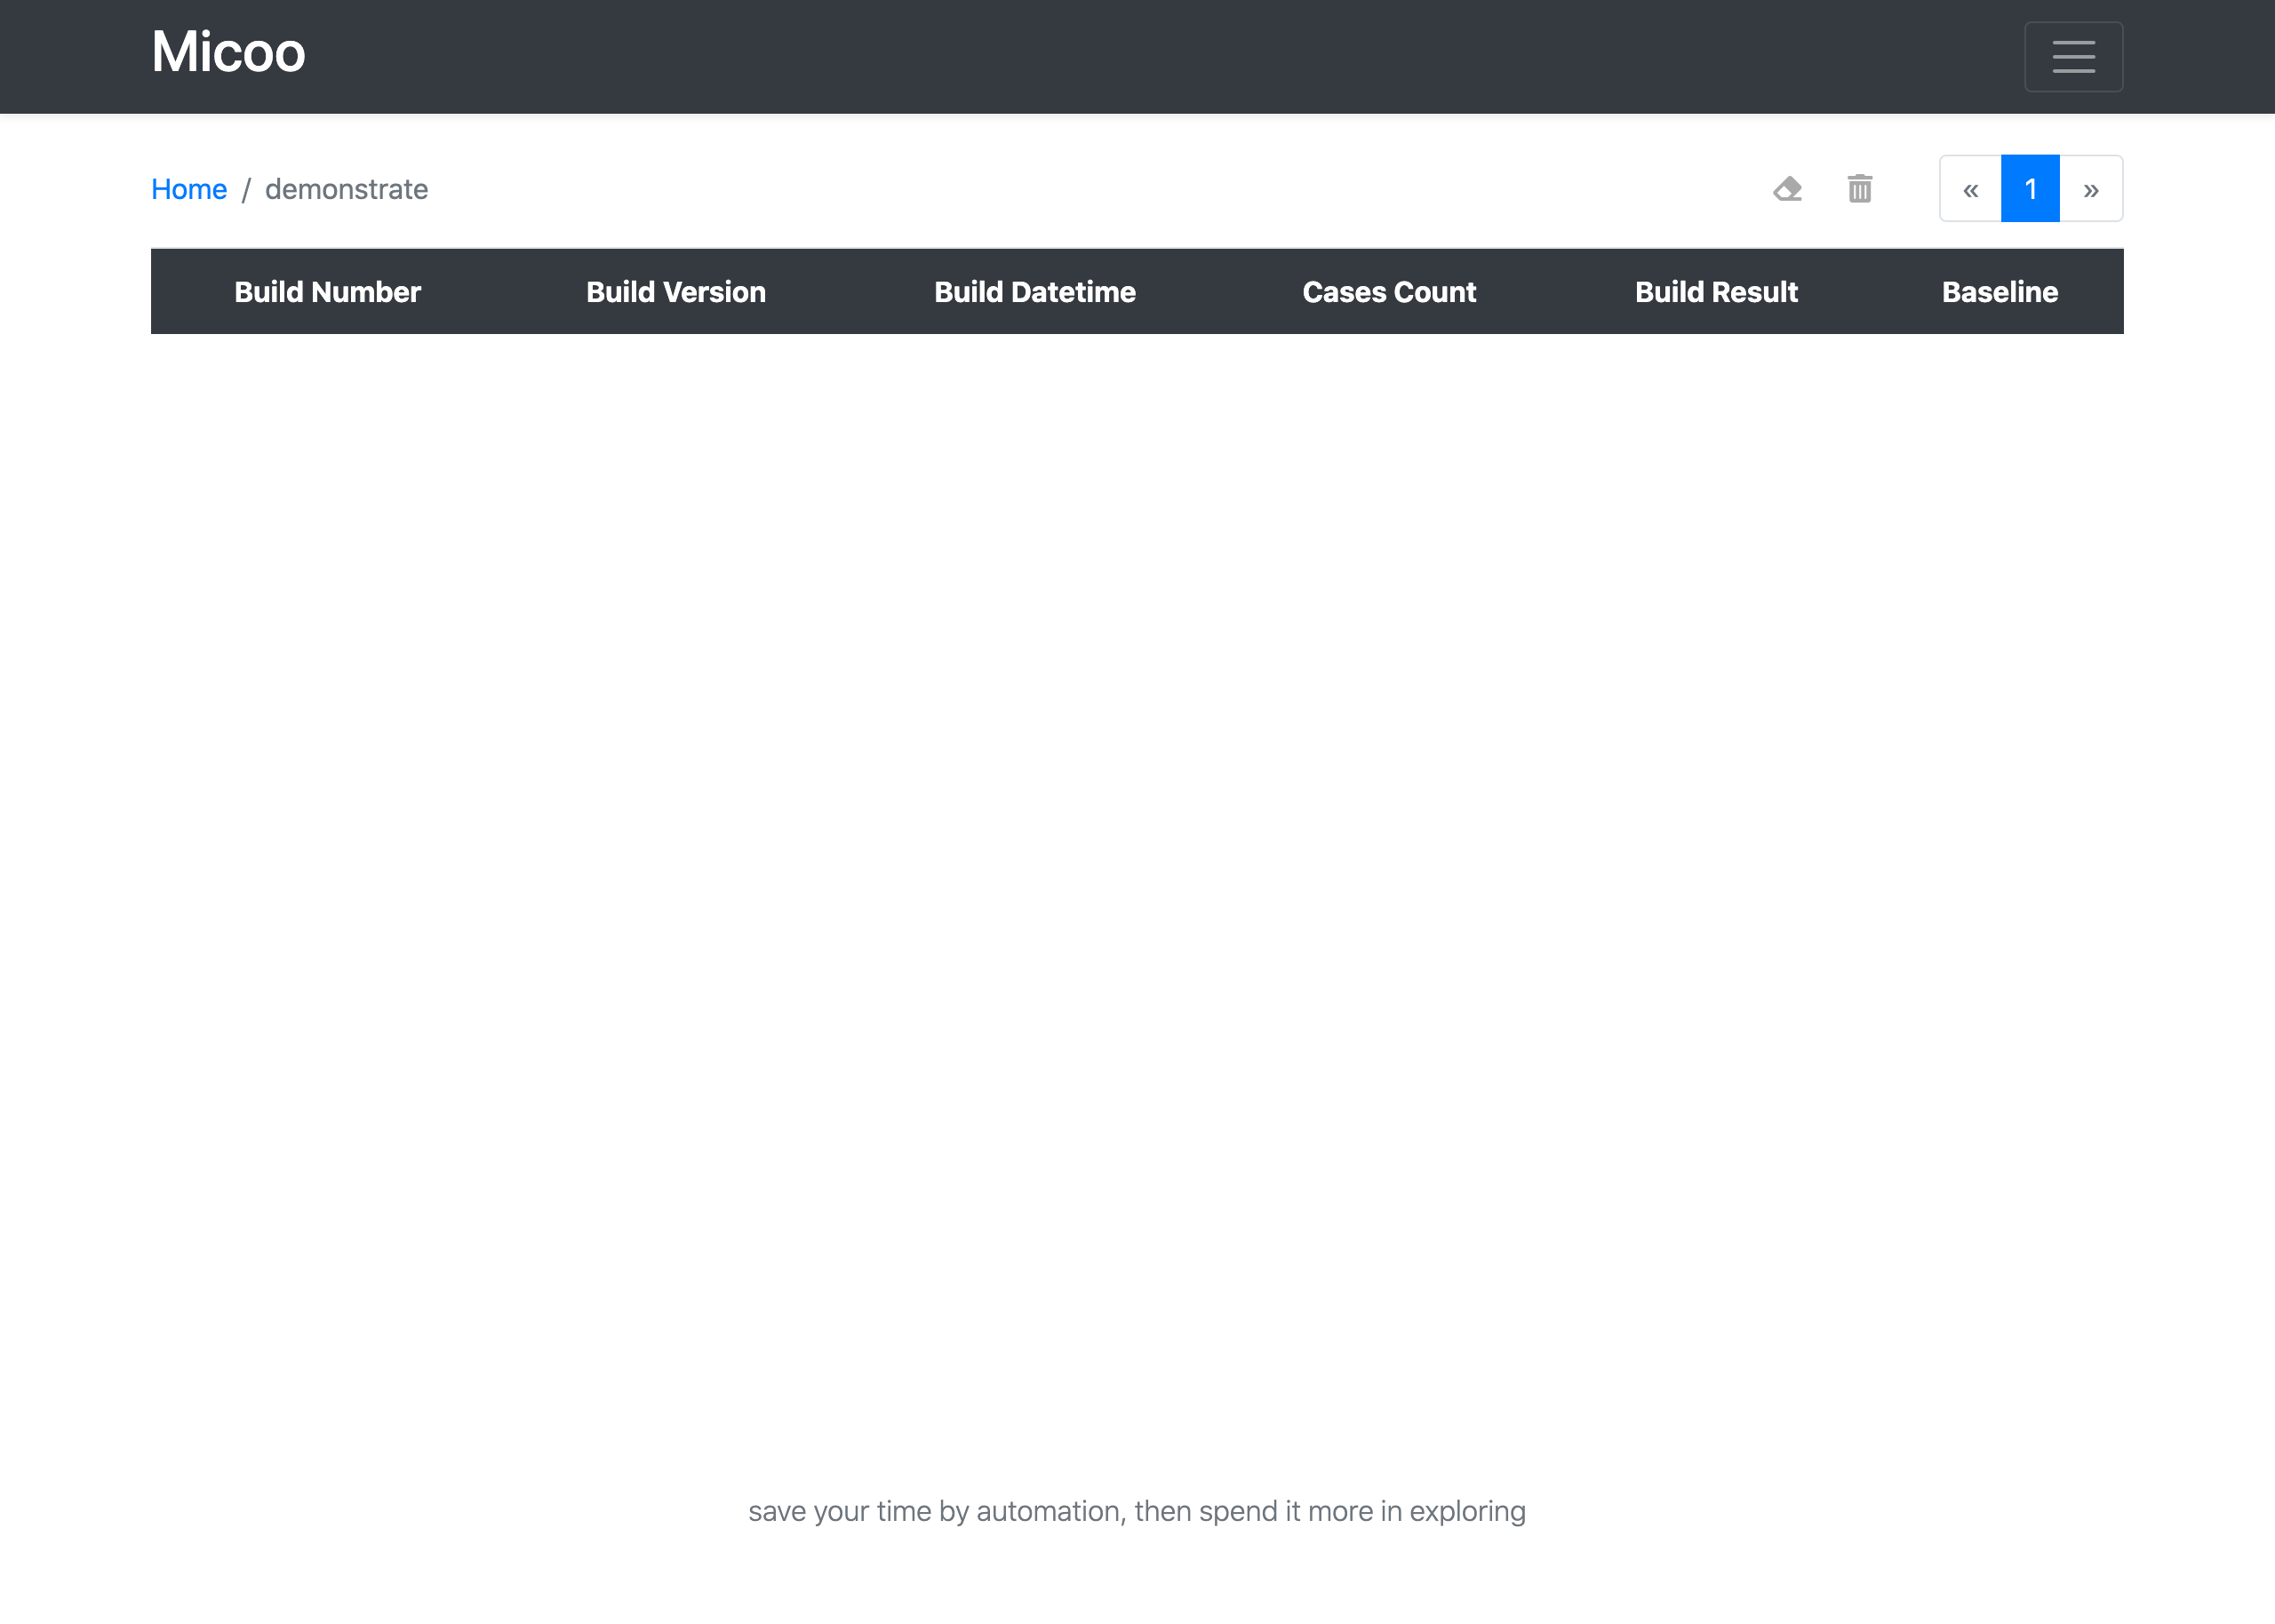
you can click the newly created project card to get into the project page, so far, it’s an empty project, no test build.
Prepare SUT application screenshots
Micoo is designed to only focus on screenshots comparison, so the screenshots need be prepared by yourself, most of the case, by your UI automation tests. For this demonstration, let’s use Puppeteer to simulate a quick Web application UI automation test.
- install Puppeteer
mkdir -p my-test/screenshots
cd my-test
npm init
npm i puppeteer
- create test script
generate a test script ui-test.js and put in the below code
const puppeteer = require('puppeteer');

(async () => {
  const browser = await puppeteer.launch({headless: false});
  const page = await browser.newPage();

  await page.goto('https://www.bing.com');
  await page.screenshot({path: 'screenshots/test-bing.png'});

  await page.goto('https://www.microsoft.com');
  await page.screenshot({path: 'screenshots/test-microsoft.png'});

  await browser.close();
})();
this test open browser to visit bing and microsoft’s home pages, take screenshots and save them in folder screenshots.
the screenshot filename would be used as test case name in Micoo, MUST in the form of [a-zA-Z0-9-_]+.png.
Upload screenshots to Micoo and trigger visual comparision
Once we have all test screenshots ready, we can upload them to Micoo and trigger visual testing. To achieve that, we need us Micoo’s client library,
npm i micooc
then, we can create another script visual-test.js, and put in below codes
const { newBuild } = require("micooc");

async function test() {
  const host = "http://localhost:8123/engine";
  const apiKey = "AK005fca5cbc9779755f";
  const pid = "PIDd9c19675fc864b34a74b97232fcc338a";
  const buildVersion = "5fafc0478af24af2da45fa19ddd06c17dd5d0d45";
  const screenshotDirectory = "./screenshots";

  await newBuild(host, apiKey, pid, buildVersion, screenshotDirectory);
}

test();
there is only one function newBuild we need call, and provide it 4 parameters
host- the Micoo’s base URL plus/engine,apiKey- the project’s API Key, it could be found in the configuration on the Project page,pid- your Micoo project’s PID, it can be found in the configuration on the Project page,buildVersion- this build version is neither parts of Micoo, nor your UI automation test, it needs to be the version of you SUT application, most of the case, it’s the git revision number.buildVersionis a useful setup of mappings between your visual tests and the SUT application. Anyway, technically, it’s just a string which will be displayed in Micoo’s project board, you can use anything which is meaningful to you.screenshotDirectory- the directory where contains all screenshots to be uploaded, only.pngfile will be uploaded.
it’s time to upload the screenshots and start the visual testing
node visual-test.js
in terminal, you would probably get something like this

Initialize Baseline
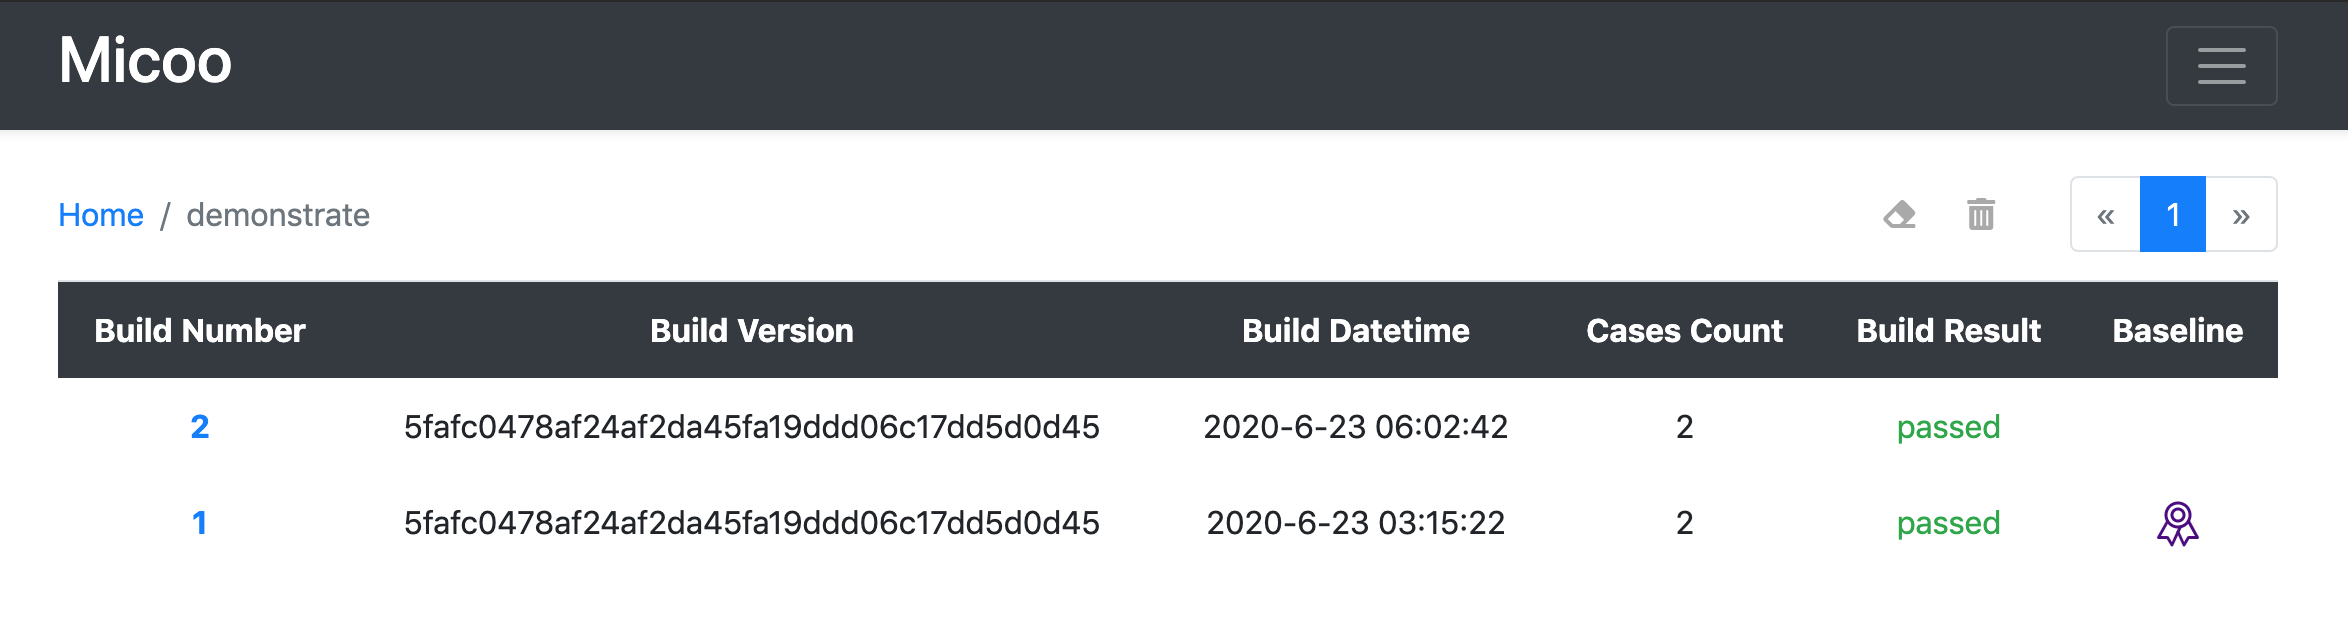
After you first upload, in Micoo project page, you would see something like this
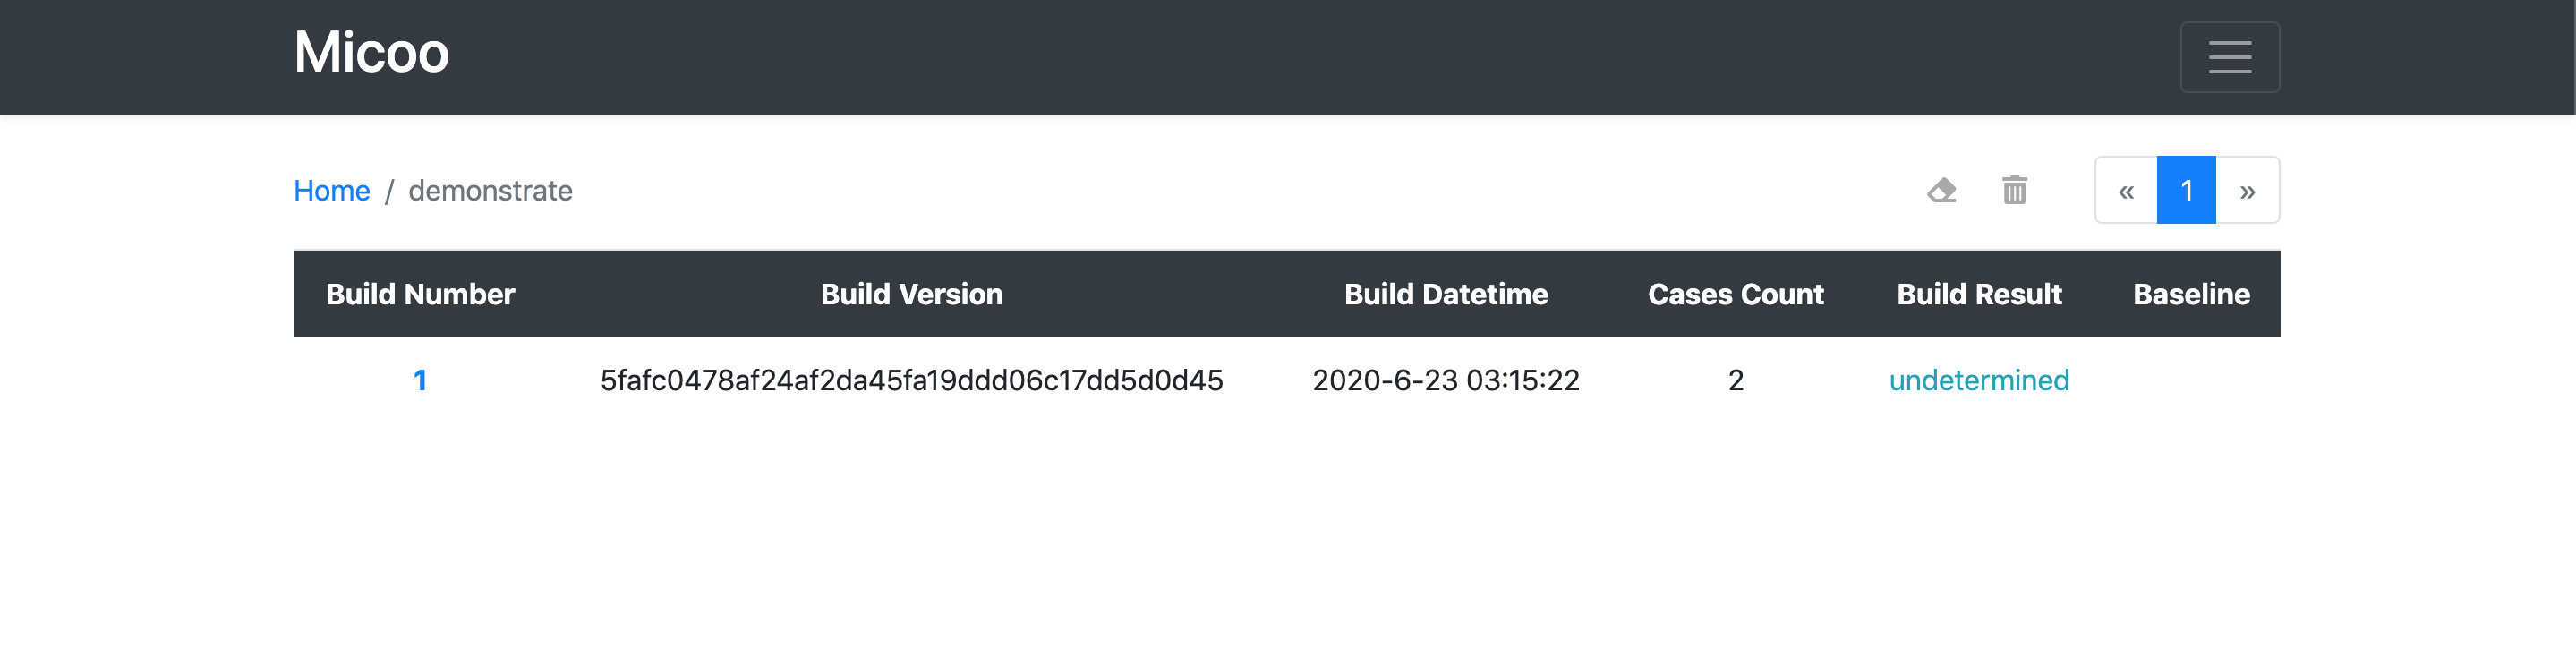
Every time when you upload a batch of screenshots, Micoo will take them as a test build, each of the
screenshots would be a test case with the case name from the screenshot filename.
Once a new test build created, the currently newly uploaded screenshot becomes test case’s latest image, Micoo then try to find each test case’s baseline image, to compare with the latest image, if there is any pixel mismatch, Micoo generates a diff image, all the baseline, latest and diff images will be displayed in Micoo test case page.
For now, since it’s the first build we created, there is no baseline image, so test build’s result and all test cases’ results are marked as undetermined. Click build number can navigate to test build page.
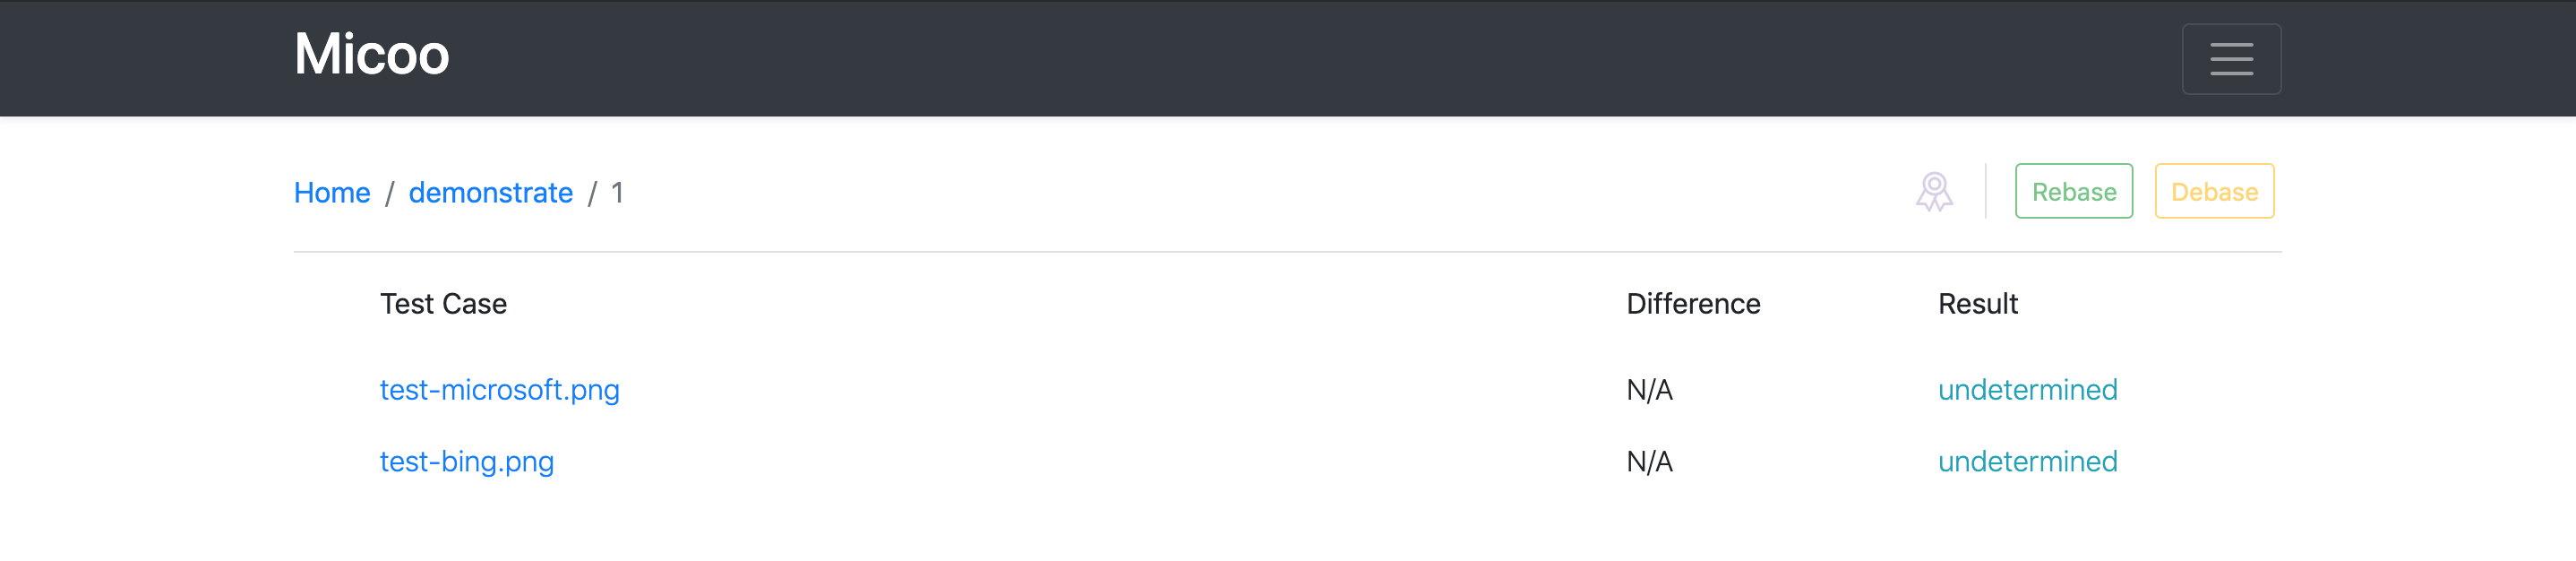
Click each test case name to open test case page, here you can view the uploaded screenshot, if they are correct, click the Passed button
You can use <- and -> to navigate between all test cases, once you passed all the test cases, click breadcrumb to go back to test build page, now, all test cases should be marked as passed.
Click the Rebase button will tell Micoo to mark current build as a baseline build, all the screenshots in this build will be set as their test cases’ baseline images. The same test case’s latest image in the subsequent test build will be compared against these baseline images, until you rebase a newer baseline build, or debase the current baseline build.
only test build with all passed test cases can be marked as baseline build.
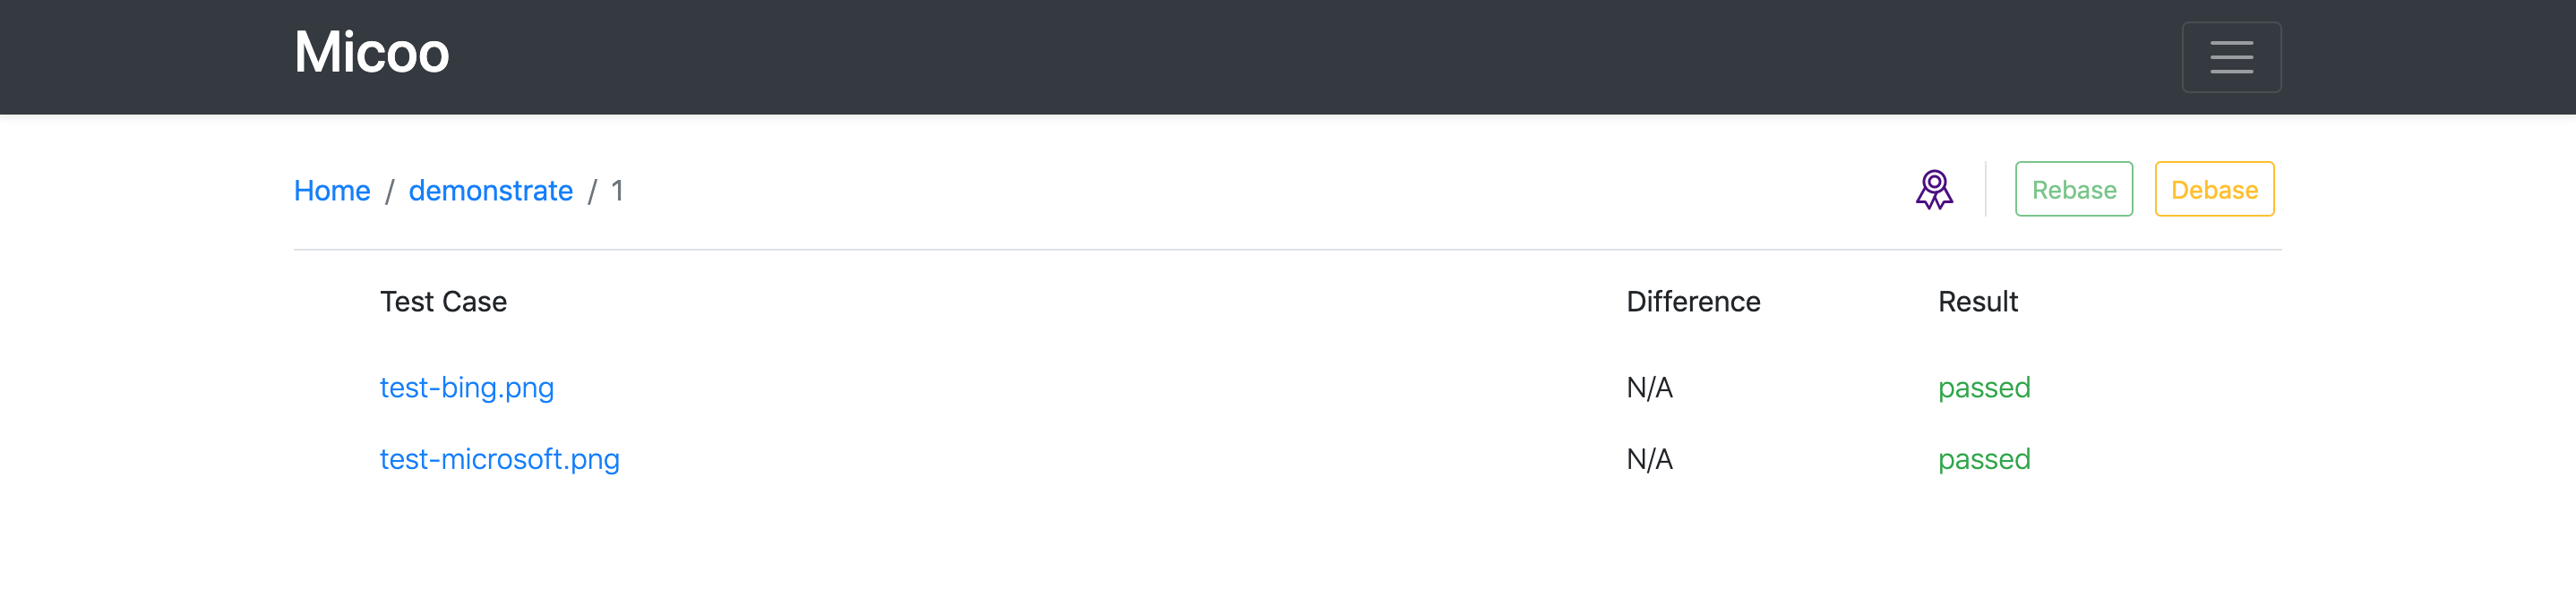
You can mark multiple and different test builds as baseline build, only the latest baseline build and its baseline screenshots take effect. If you click the Rebase button to rebase the latest baseline build, the previous baseline build, if exists, becomes the real baseline build.
This rebase and debase function give you ability to easily switch baseline among the latest and all previous test builds, this is quite useful, for example, set a baseline to a build which shouldn’t be by mistake trigger, or even misunderstanding of the SUT application’s design and implementation.
Subsequent tests
Once you have a baseline build for the project, in your subsequent test, you only need to repetitively take screenshots (for different SUT application version) and upload them to Micoo, all the comparision will automatically happen.
Let’s try upload the same screenshots again
node visual-test.js
Now you will get a new test build and test cases passed
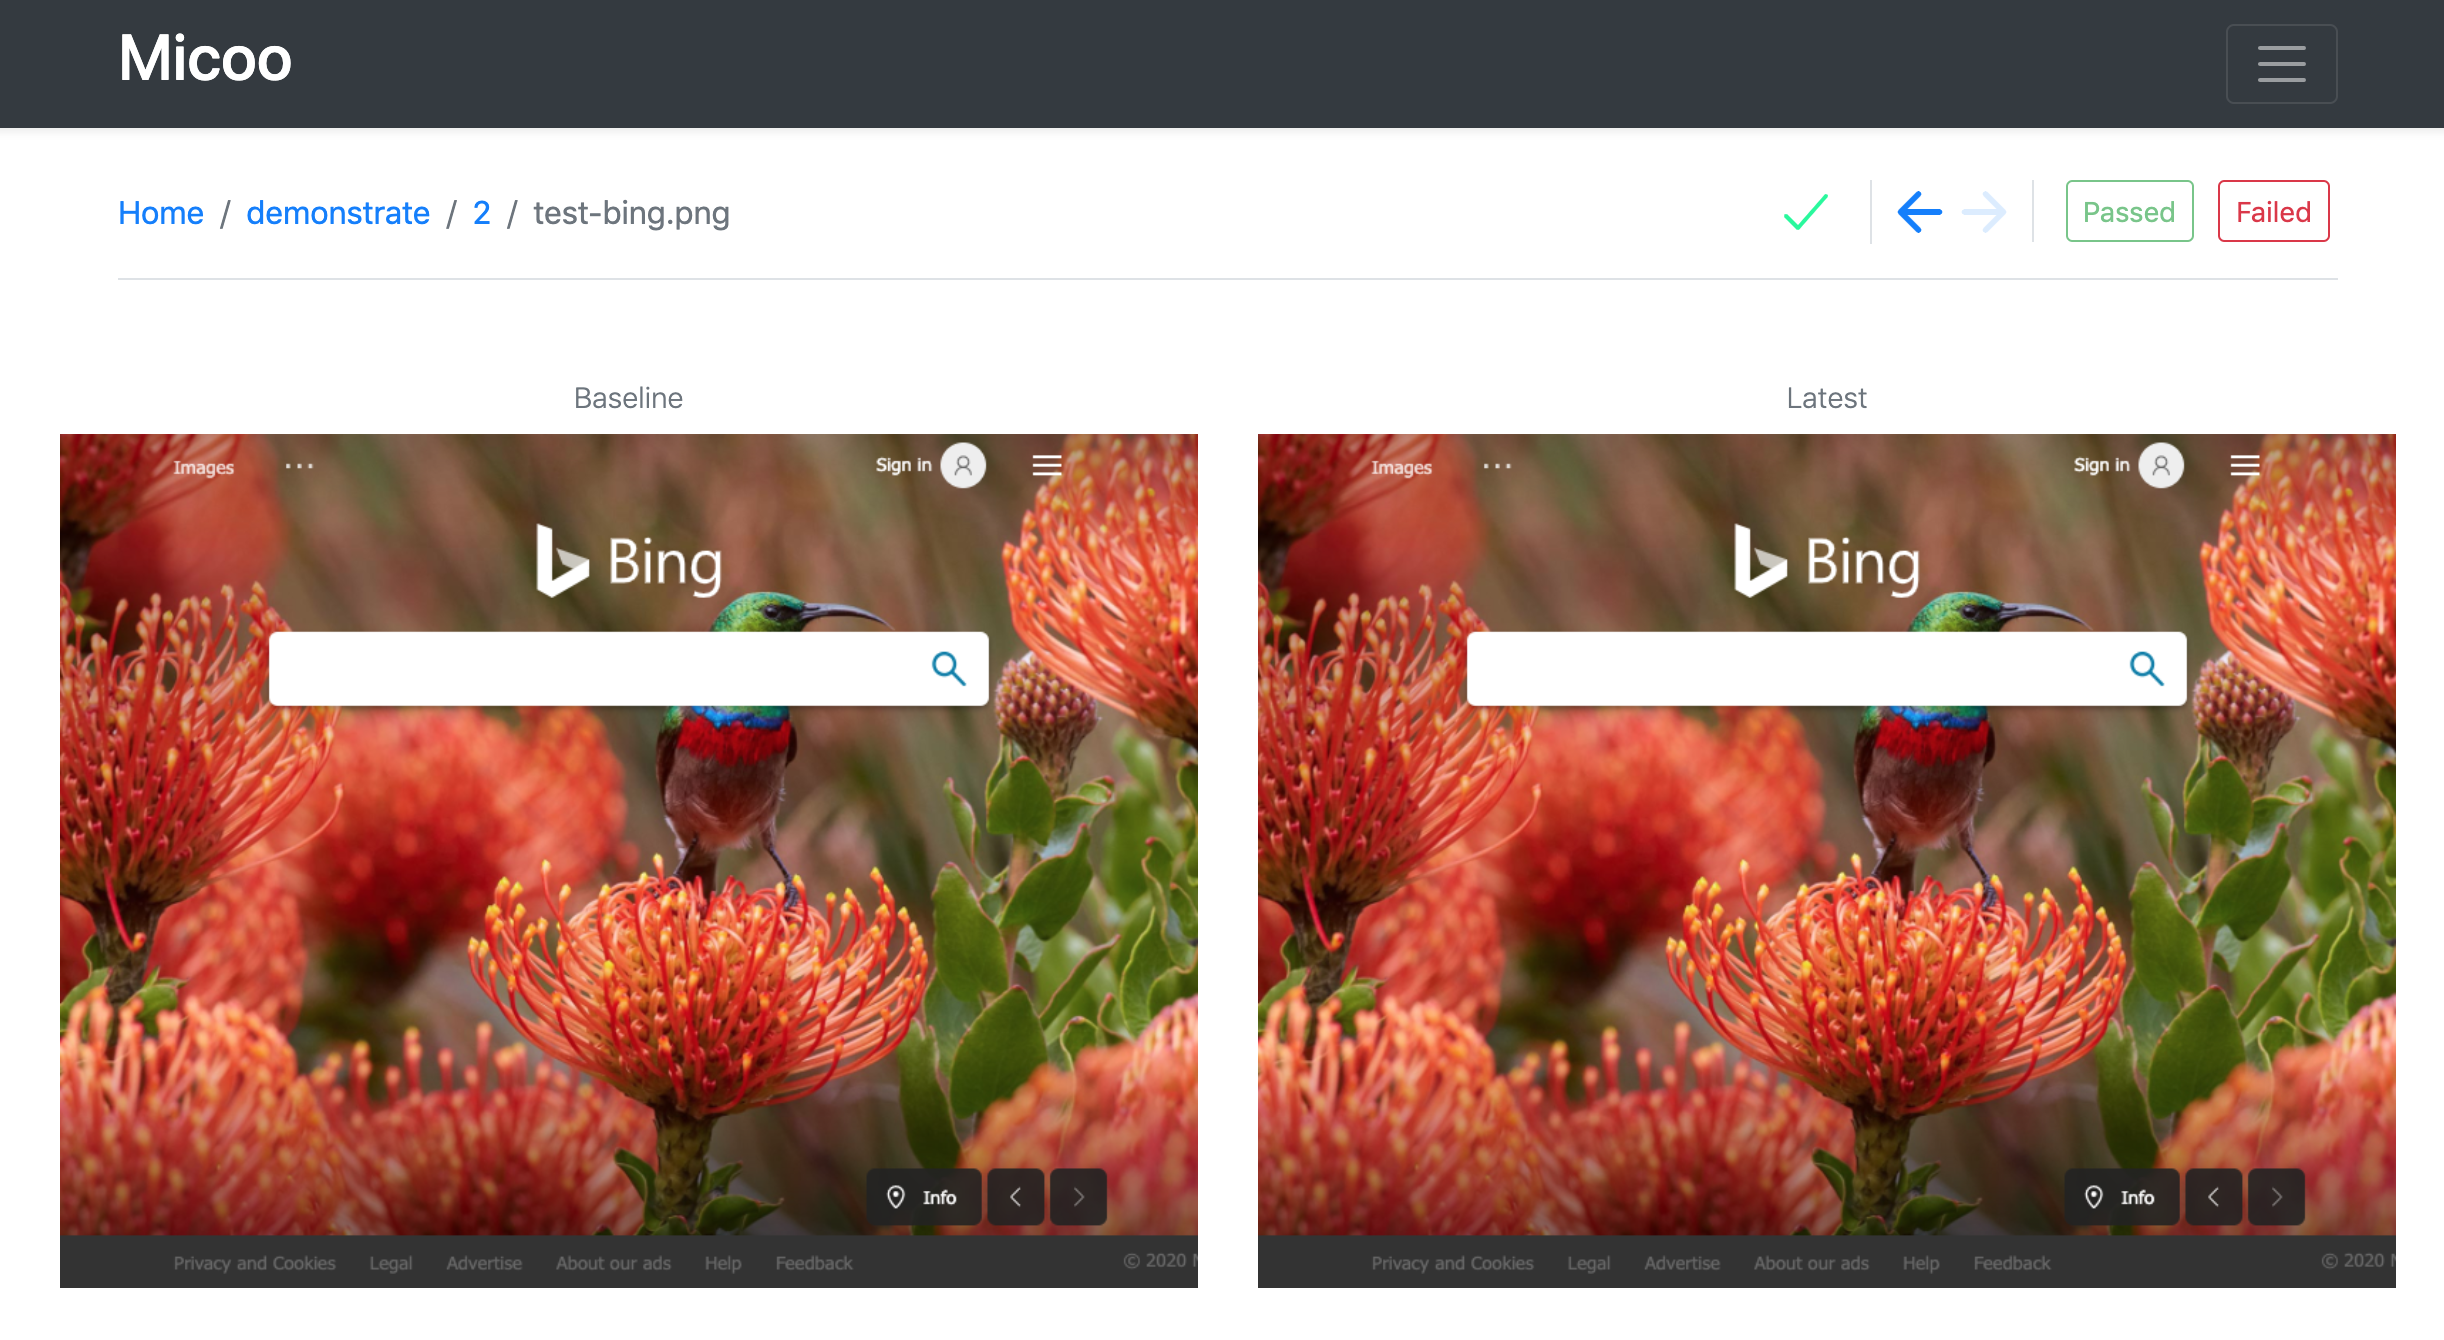
When there comes any mismatch between the latest screenshot and baseline screenshot, Micoo will find it and show you
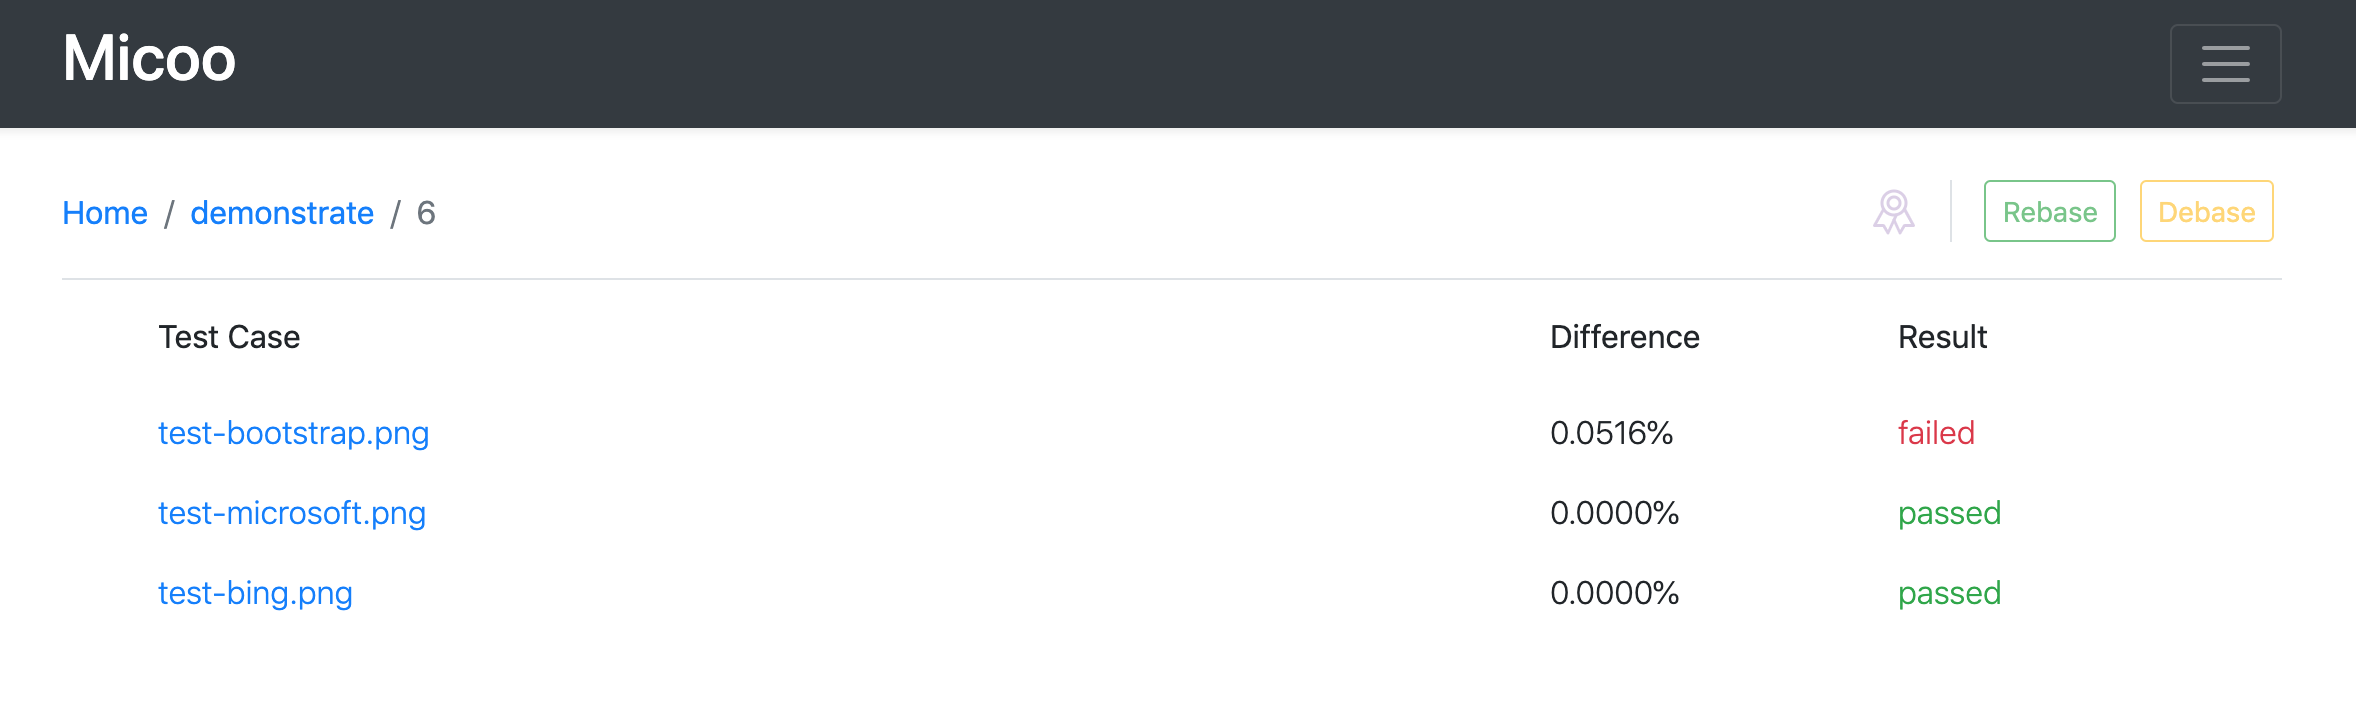
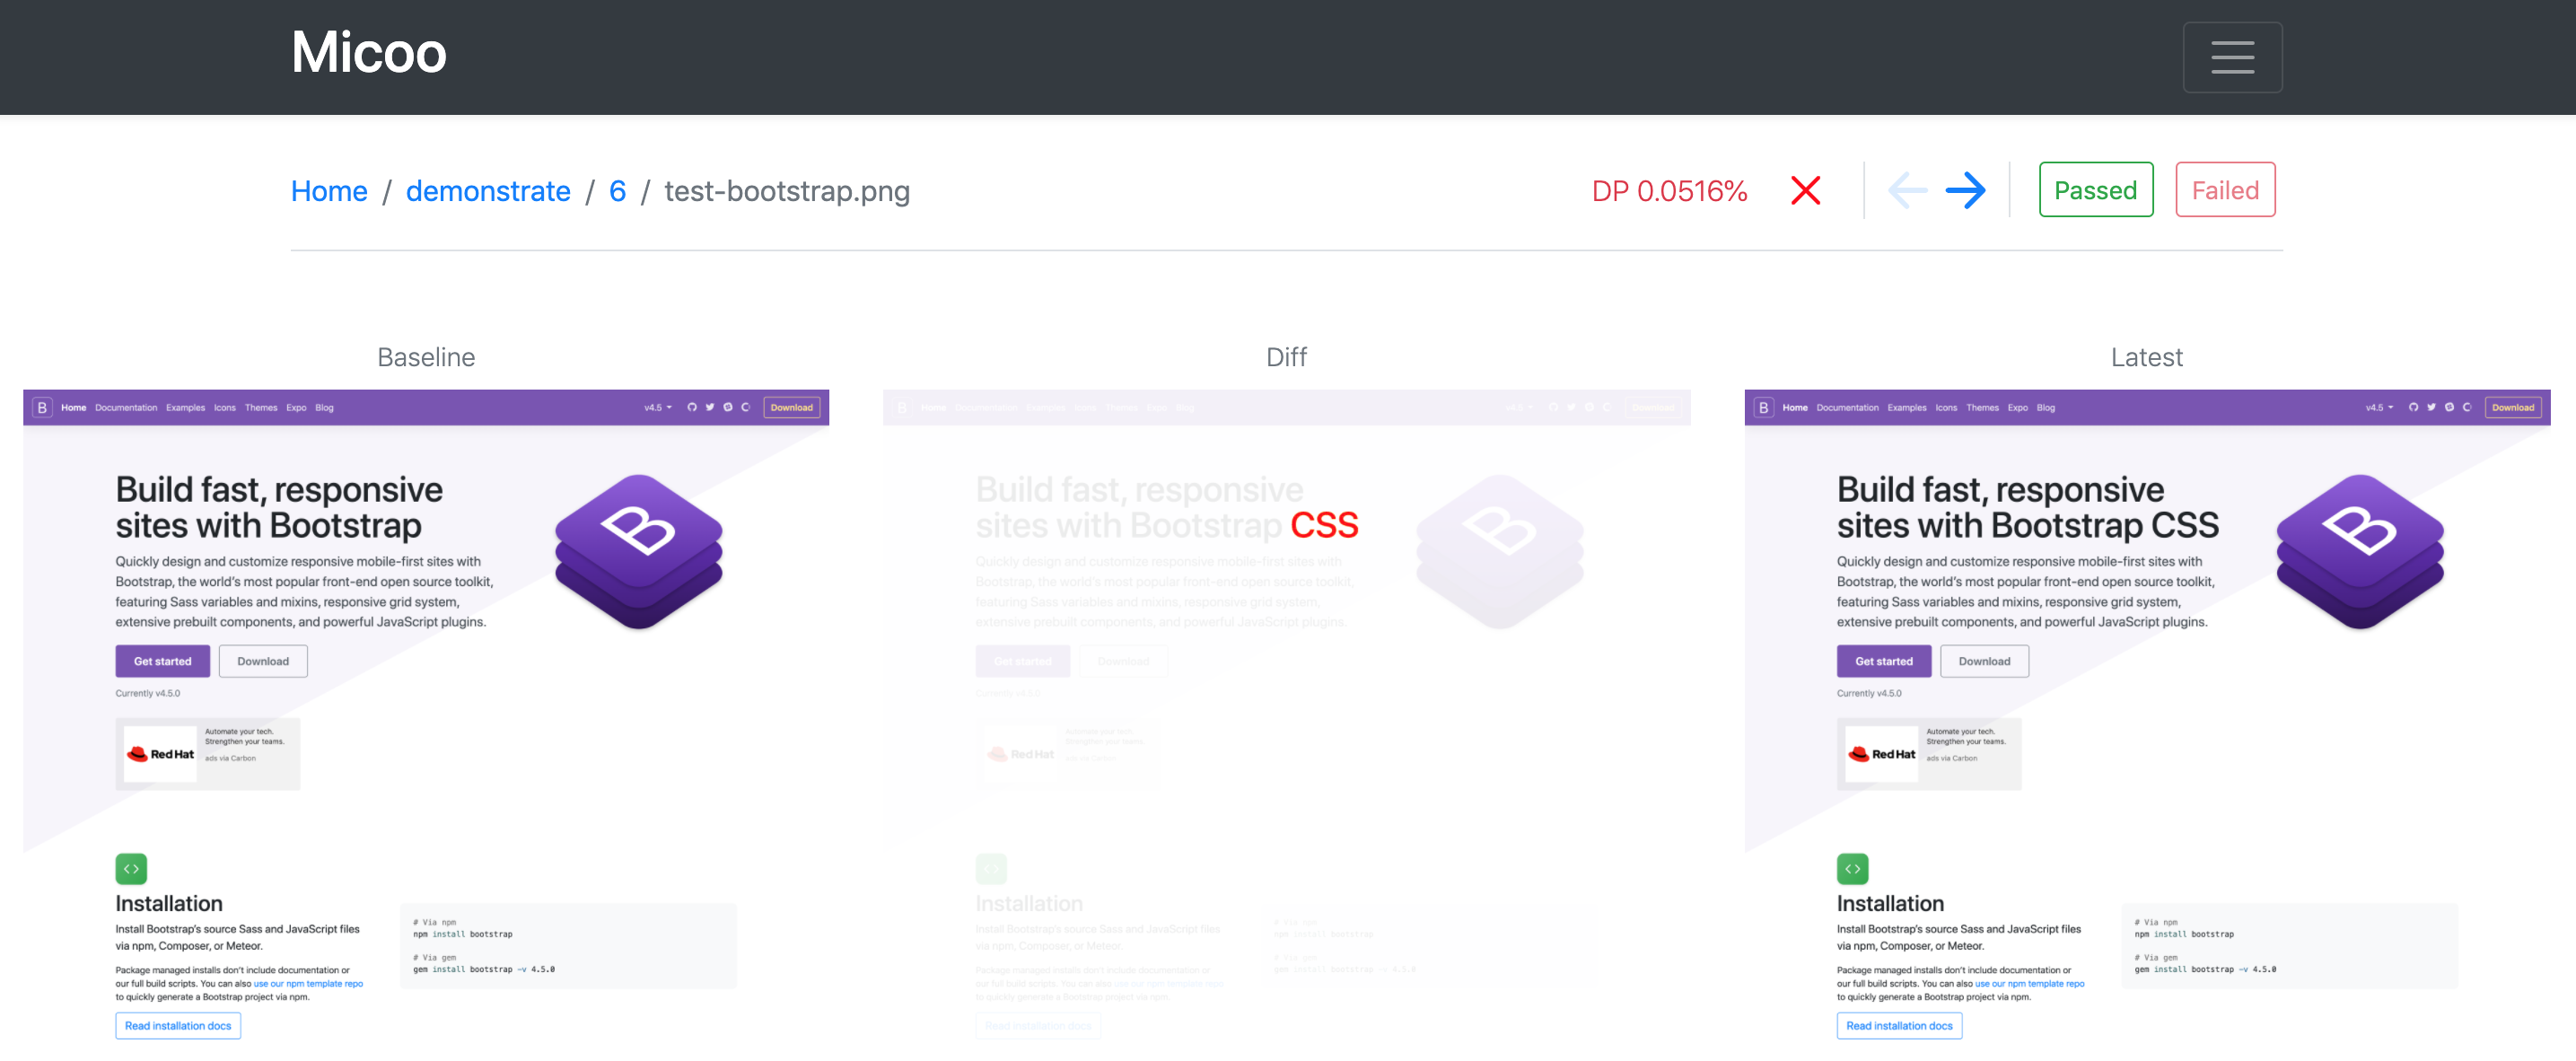
Check the difference
In the test case page, the baseline and latest screenshots will be shown together with the difference image, sometimes, it is difficult to clearly see the every details on the shrunken screenshots, so Micoo provides some convenient ways on that:

Open in a bigger view
click on baseline or latest screenshot, it will open a modal to display the screenshots in their original size or in your fullscreen size.
Zooming on the screenshot
put mouse on the baseline or latest screenshot, zoom-in, zoom-out and dragging are support to help check the screenshot details.
Compare with slider
click the image compare button on the tool panel, it will open an image compare modal, in the compare modal you can move the slider to find the difference between baseline and latest screenshots more easily.
Ignoring
Dynamic content, e.g. video, gif, and other inconsistent data, e.g. datetime, unique ID, verification code, are usually blockers to visual regression testing, their display are always different from each time the tests taking screenshots, thus makes it difficult to do pixel based image comparing. To help resolve this kind of problems, Micoo provides a solution called Ignoring Rectangles, that user can draw any size and any mount of rectangles on the baseline screenshot, any mismatch between baseline and latest screenshots which happens on those rectangles will be ignored by Micoo’s automatic comparing, this could help to make the visual testing running much more stable against any dynamic and inconsistent elements on the screenshots.
Create Ignoring Rectangles
in the test case page, click the Ignoring Rectangles button on the tool panel, it will show the Edit Ignoring modal, the modal displays the baseline screenshot, on the image, draw rectangles by dragging and releasing the cursor, then click the Save button and close the modal.
after the page refreshed, the diff image will be added some rectangles in light green, which reflects the ignoring area given to this test case, also once a test case has ignoring rectangles, it will display a star mark preceding the Ignoring Rectangles button as a notice.
Remove Ignoring Rectangles
in the Ignoring modal, click on any exists rectangles and click the Remove button will delete those selected Ignoring Rectangles.
Some special cases
please pay attention to below special cases with working with Ignoring Rectangles:
Rebase & Debase
since Ignoring Rectangles are applied on baseline screenshots, while Rebase and Debase operations change the current project’s baseline, so by default Rebase and Debase operations will delete all Ignoring Rectangles of all test cases in that project. If you need to keep some Ignoring Rectangles regardless the baseline changes, you can check Preserve Ignoring on Rebase option on each project’s configuration, this will disable cleaning Ignoring Rectangles on Rebase and Debase.
Soft Passed
when Micoo compare a test case’s latest screenshot with its baseline screenshot, if there are mismatches only happened within ignoring rectangles, the latest screenshot will be judged as Soft Passed, soft passed test case will be given the result “passed” in blue color to distinguish from other truly passed test cases which “passed” are in green color, and also in the test case page, an orange border will be given to the check mark of a soft passed test case.
soft passed test case can be further judged as truly passed by clicking the Passed button manually. The most important notification is that a test build with soft passed test cases can not be set as baseline, if you need to rebase a build as new baseline, you must give truly passed result to all soft passed test cases first.
Change project card background image
Any time when you create a new project in the dashboard page, the project card has a default background image, you can change it to your own favorite one. In the project page, click the image icon will trigger a file uploader modal, use it to upload your own project card background image.
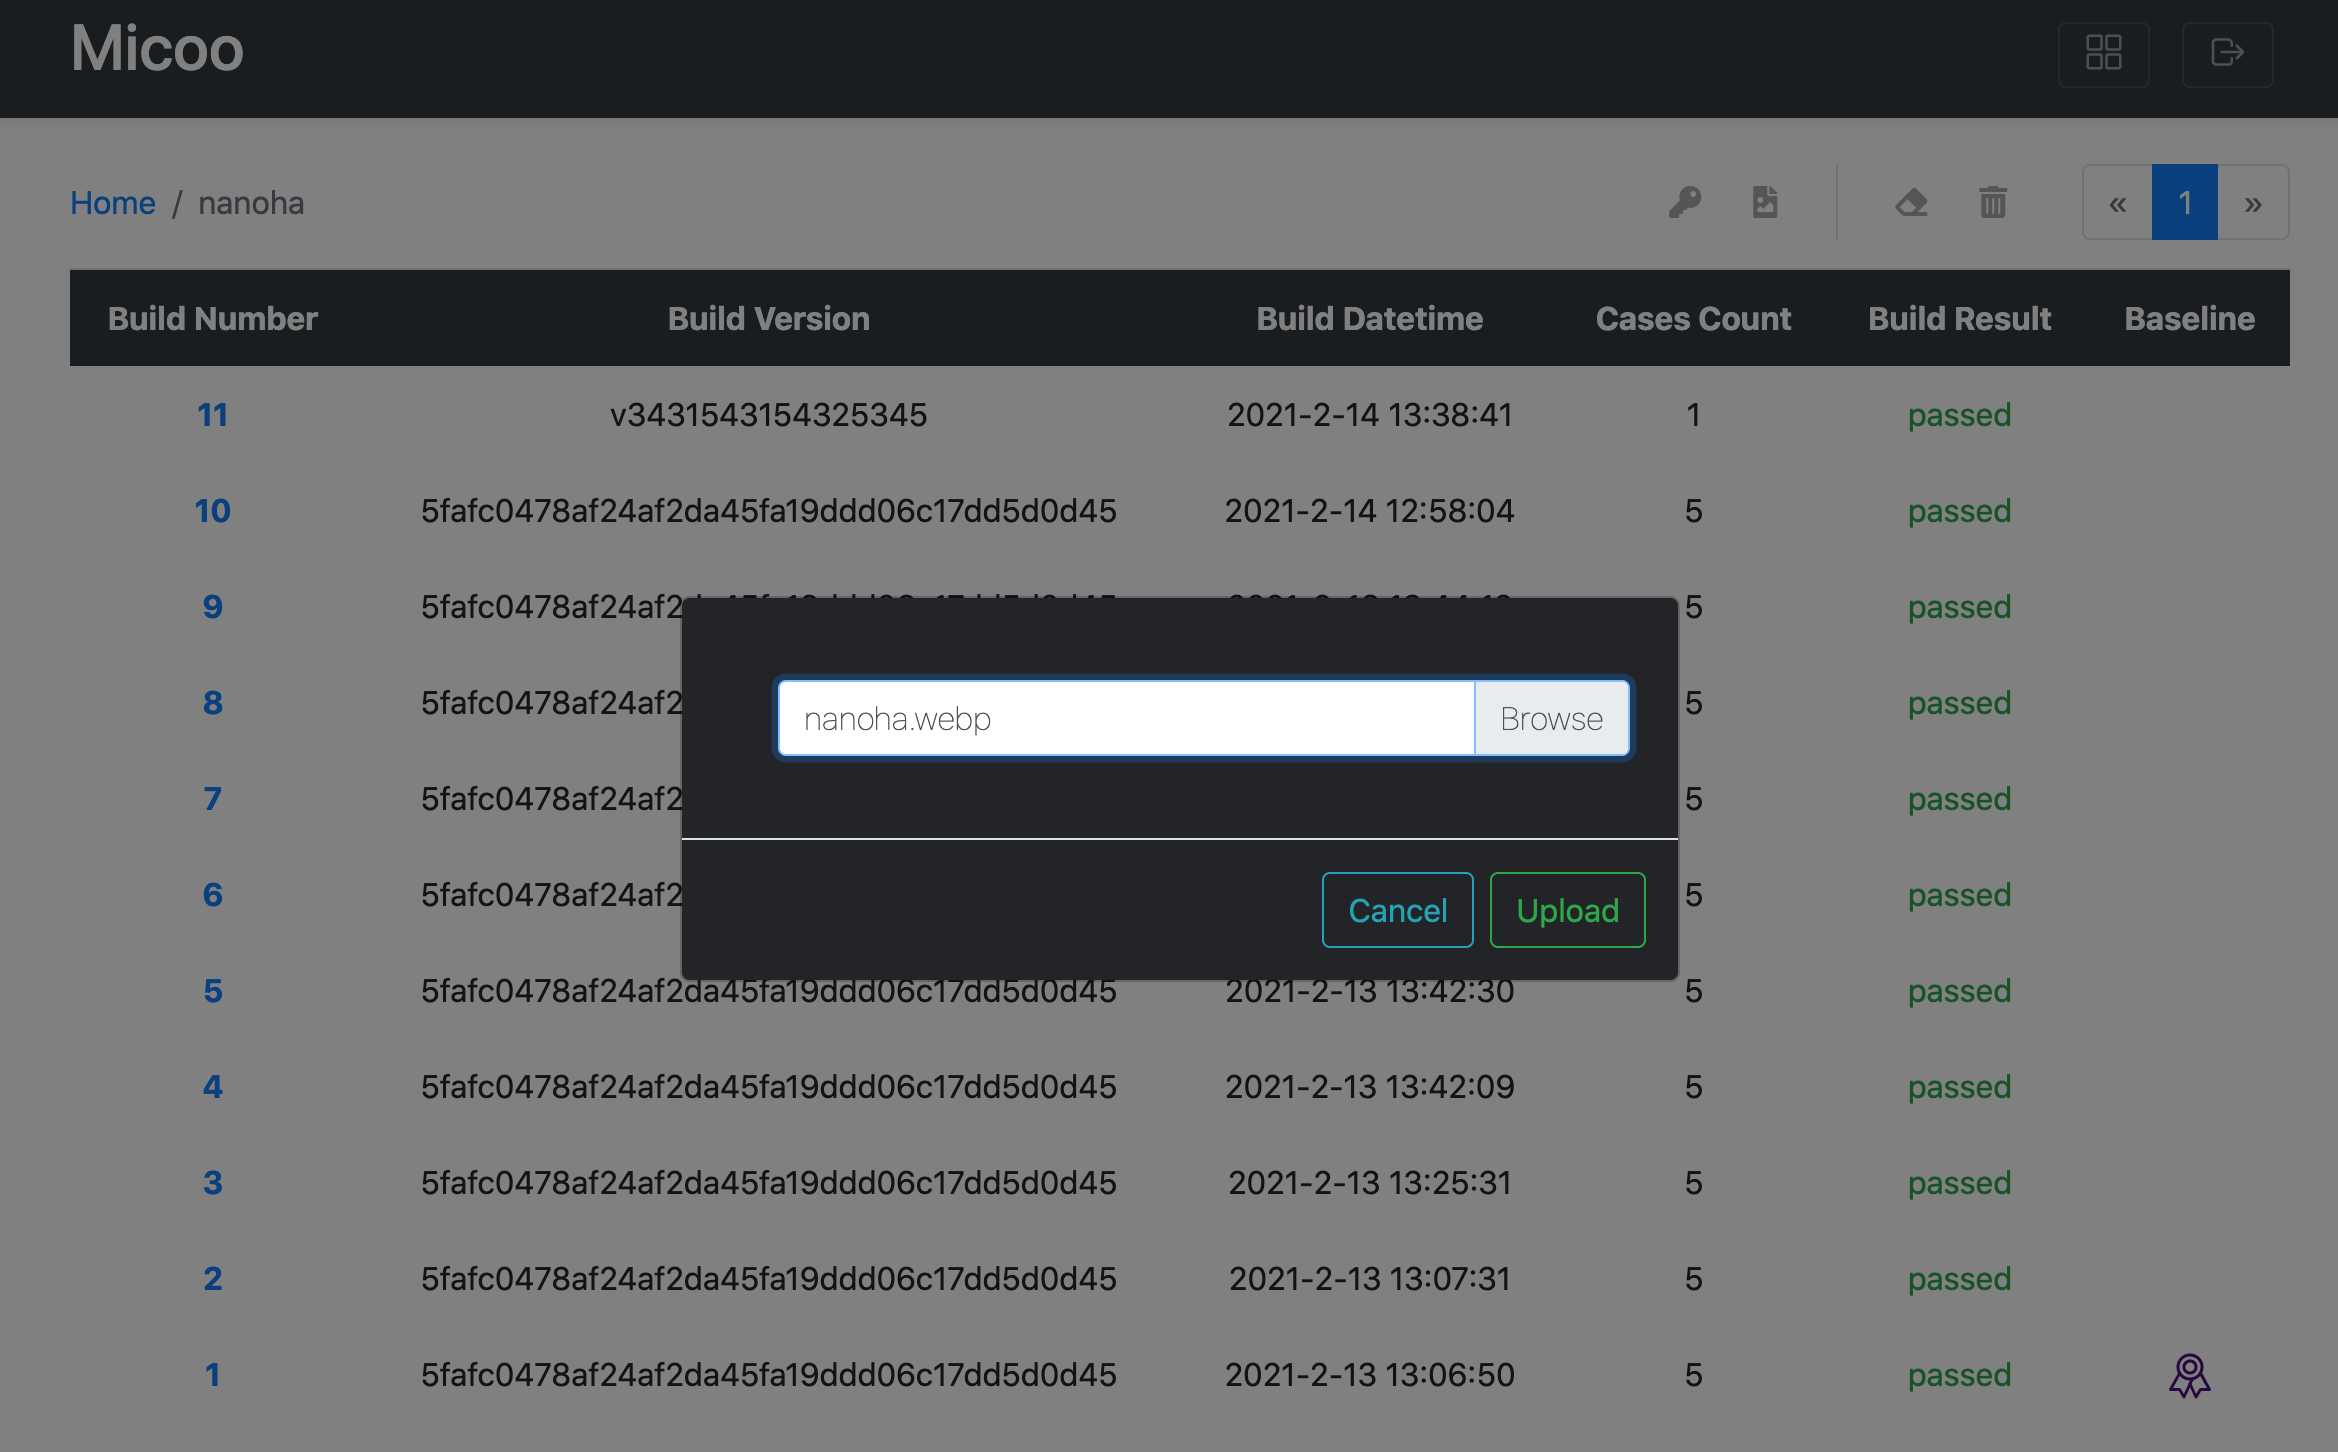
after uploading successfully, get back to dashboard page, you can see the project card background image is changed now.
prepare project card background image
To reduce the image size and match the compatibility, the project card background image must be a .webp file with radio
at 348x255. You can create such an image easily with ImageMagick, once you
installed ImageMagick, use below command to create a webp image from a normal png file:
convert original-background-image.png -resize 348x225 required-background-image.webp
Clients
Micoo is technically a service, to upload the screenshots, trigger new test build for comparision, we need call Micoo’s API, these actions have been packaged in the Micoo Clients. Currently, Micoo provides clients implementation in:
let’s take NodeJS client for example:
installation
npm i micooc
usage
const { newBuild } = require("micooc");

async function testNewBuild() {
  const host = "http://localhost:8123/engine";
  const apiKey = "AK005fca5cbc9779755f";
  const pid = "PID6fb00c63d17f4596ba831a299edd21b4";
  const buildVersion = "5fafc0478af24af2da45fa19ddd06c17dd5d0d45";
  const screenshotDirectory = "./screenshots";

  await newBuild(host, apiKey, pid, buildVersion, screenshotDirectory);
}

testNewBuild();
More information could be found in the Micoo NodeJS client repository, for consuming backend service without client bindings, please refer here.
CI integration
Play with localhost is not our goal, deploy on a server which is accessible to all your team members is the real direction for Micoo. Once you have done that, you can easily put visual test into automation tests in your CI.
Test Stats
Before we talk about the CI setup, there is one more thing we need know, the test stats.
Micoo doesn’t have any Email notification method to tell anyone on the comparision completeness, and if the result is passed or failed. This is not convenient to CI integration, so Micoo expose two API endpoints to get the test build stats.
get build stats
A GET request to http://[micoo-host]:[port]/stats/build?bid=[bid], you will get something like this
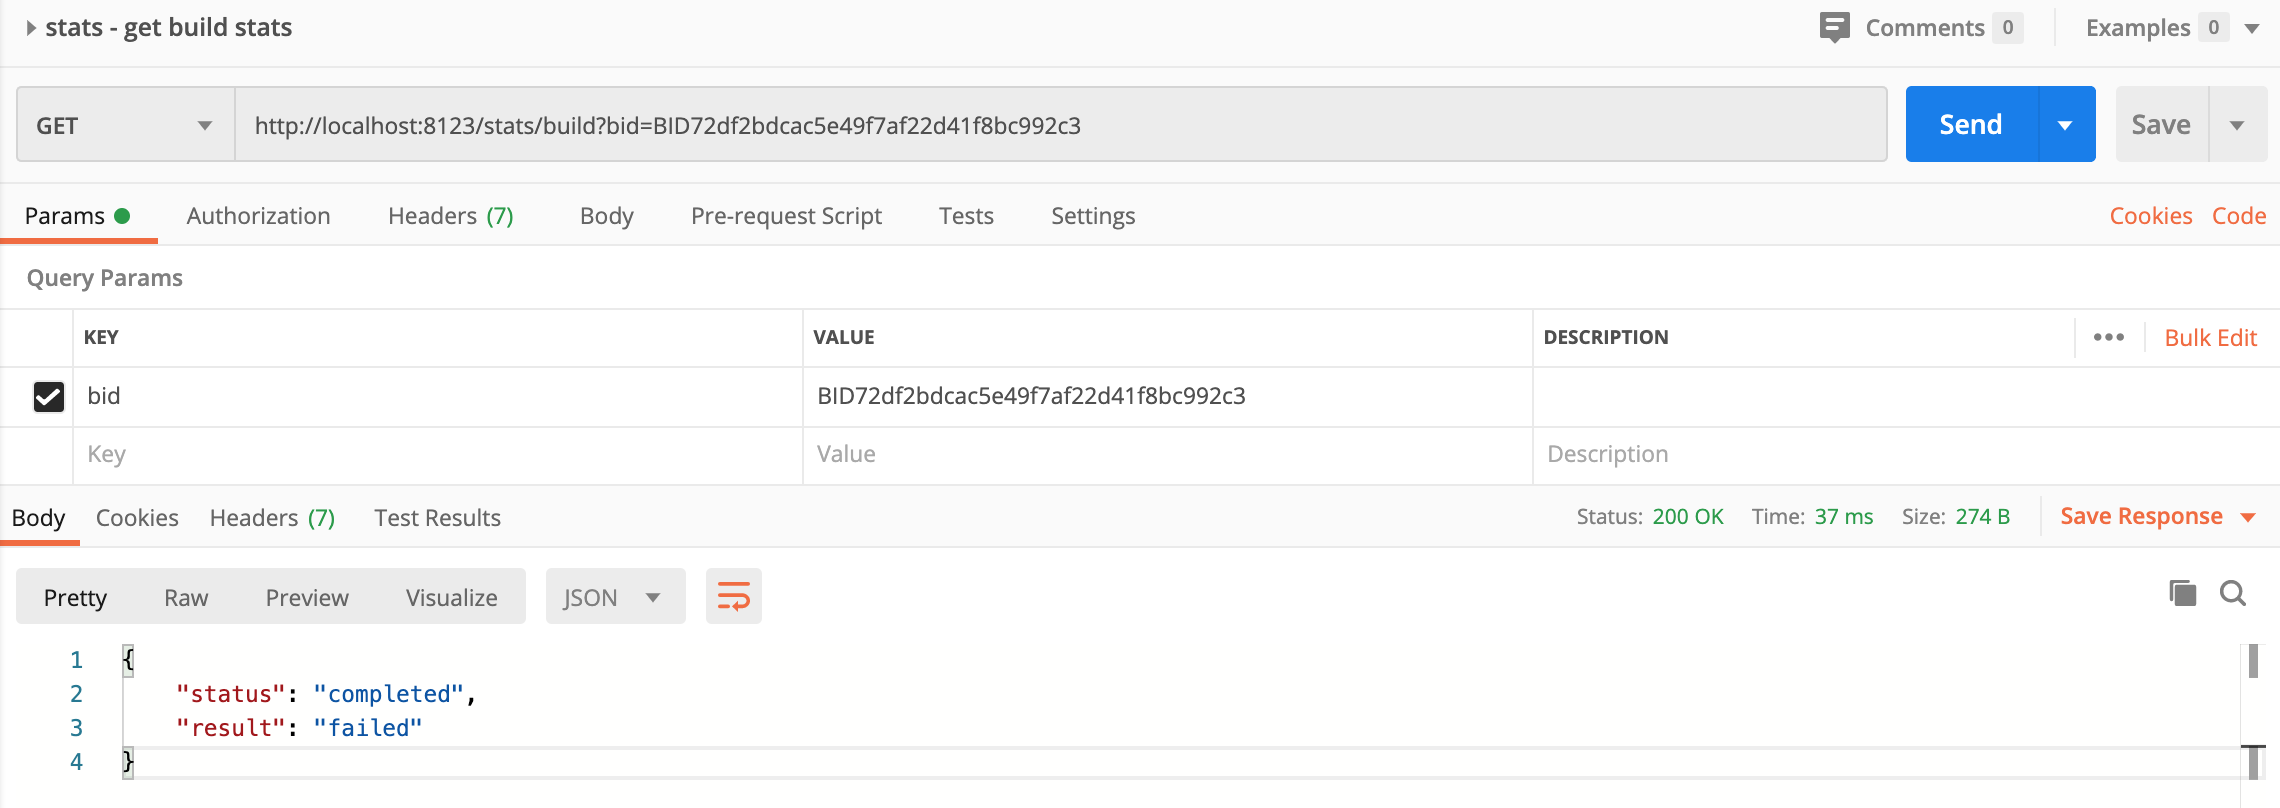
every time when Micoo client uploads screenshots and trigger new test build, there would be a response which contains the newly created test build’s
bid.
get the latest build stats
Above endpoint /stats/build is only useful when it’s able to get the bid, but if not, e.g. in your CI, it creates build in a Job/Stage/Step, but needs to fetch the stats in another Job/Stage/Step, and there is no way to share parameter between the two Jobs/Stags/Steps, then you could use the endpoint /stats/build/latest.
A GET request to http://[micoo-host]:[port]/stats/build/latest?pid=[pid], you will get something like this
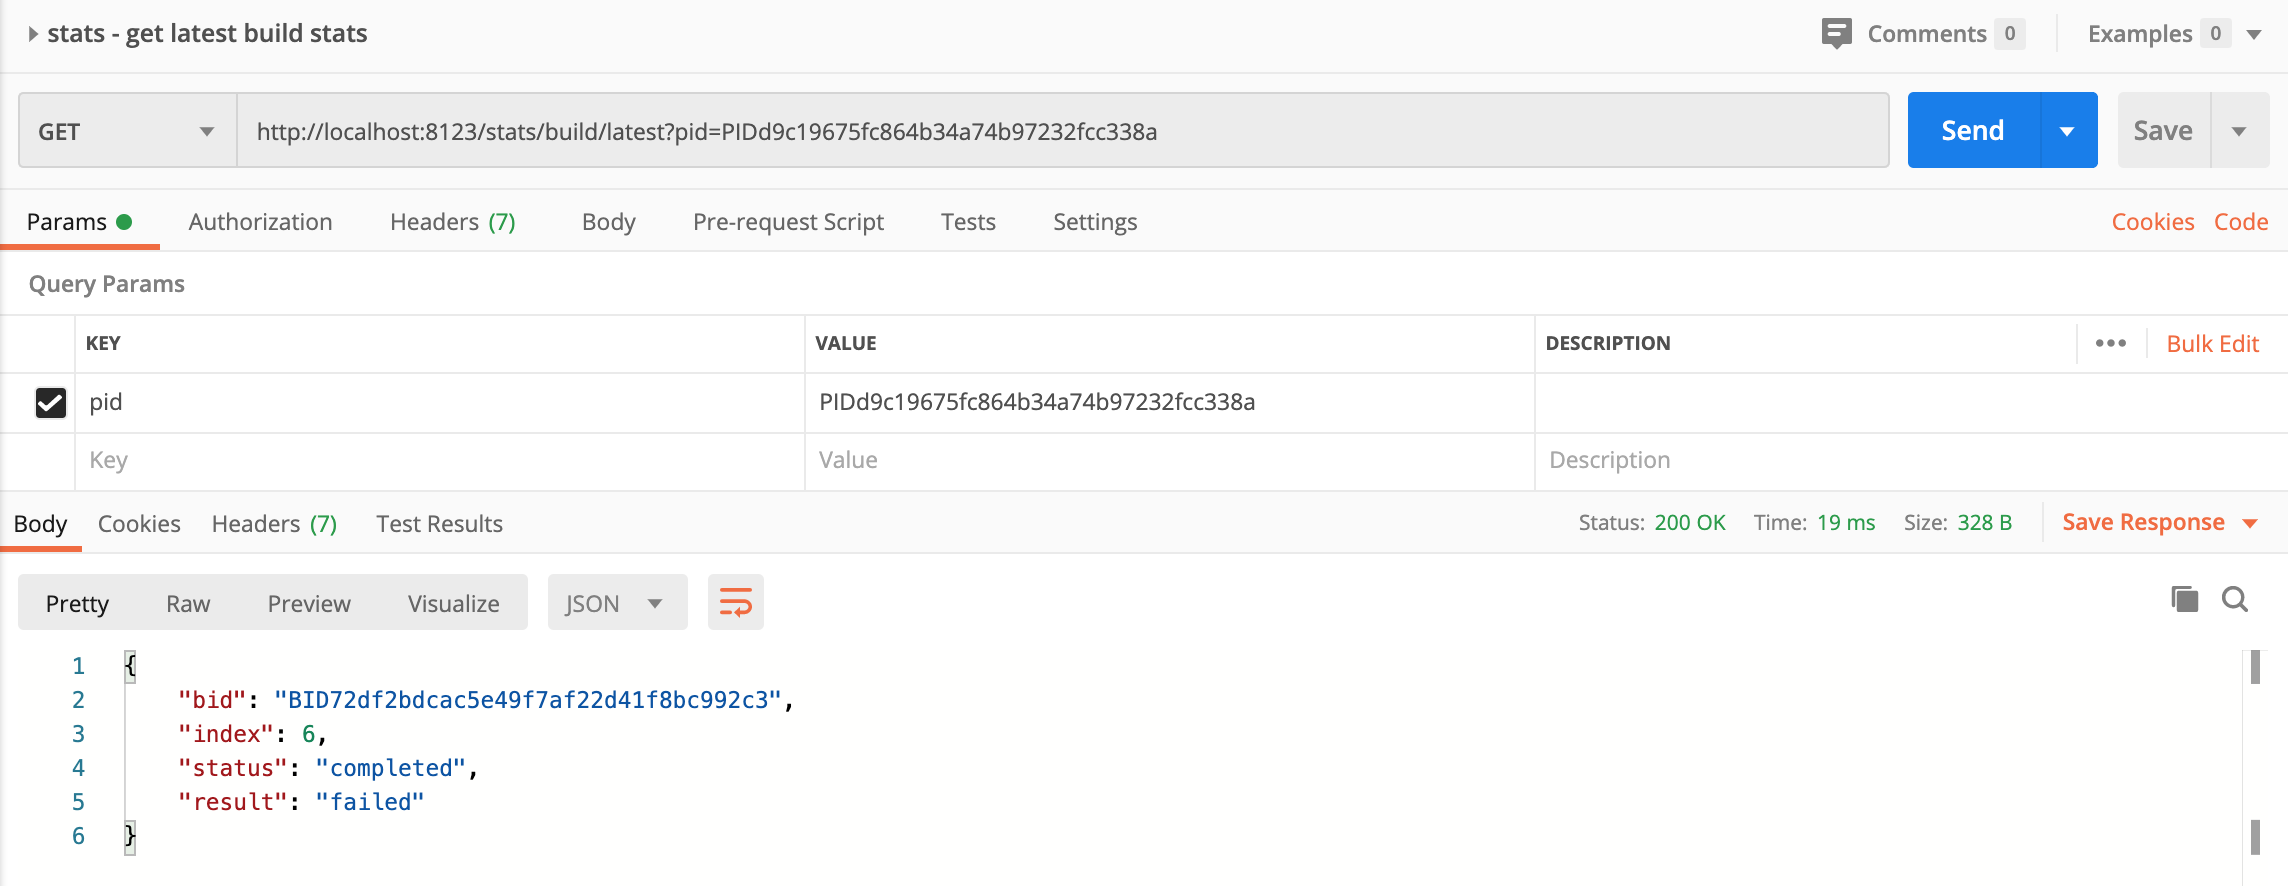
pidcould be picked up from the project page’s URL.
With above two endpoints, it should be enough to create code in any programming language you prefer, to fetch the test stats and result. Micoo client also provides corresponding functions for these, you can check usage details at the client repository.
CI setup
Once we are able to get the test stats and result, it becomes blockless to add visual test into CI.
It’s a huge topic on how to set up a functional and stable CI, so I’m not going to talk about that, the only thing I would suggest is how we can add visual test into CI pipeline setup, usually, there are two ways, synchronized and unsynchronized.
For all currently visual test solutions, including Micoo, it only detects and reports Mismatch, but Mismatch doesn’t equal to Failure, e.g. the mismatch is a new requirement, or a bug fix, which would be rebase as a new baseline. Automation cannot make such decision, it must be judged by human. This brings the thinking-point as an interruption into the CI system, if you manually handle such interruption sequentially in CI, you are running a synchronized visual test pipeline, otherwise, handle it separately, you are running an unsynchronized visual test pipeline.
synchronized visual test setup in CI

In the synchronized setup, if there is any mismatch found in visual-test stage, it blocks the CI pipeline, and need team member to check the result and take corresponding actions.
This setup brings high sensibility of the UI change, and ensure strict UI check before deployment, but somehow, decrease the pipeline’s stability.
unsynchronized visual test setup in CI
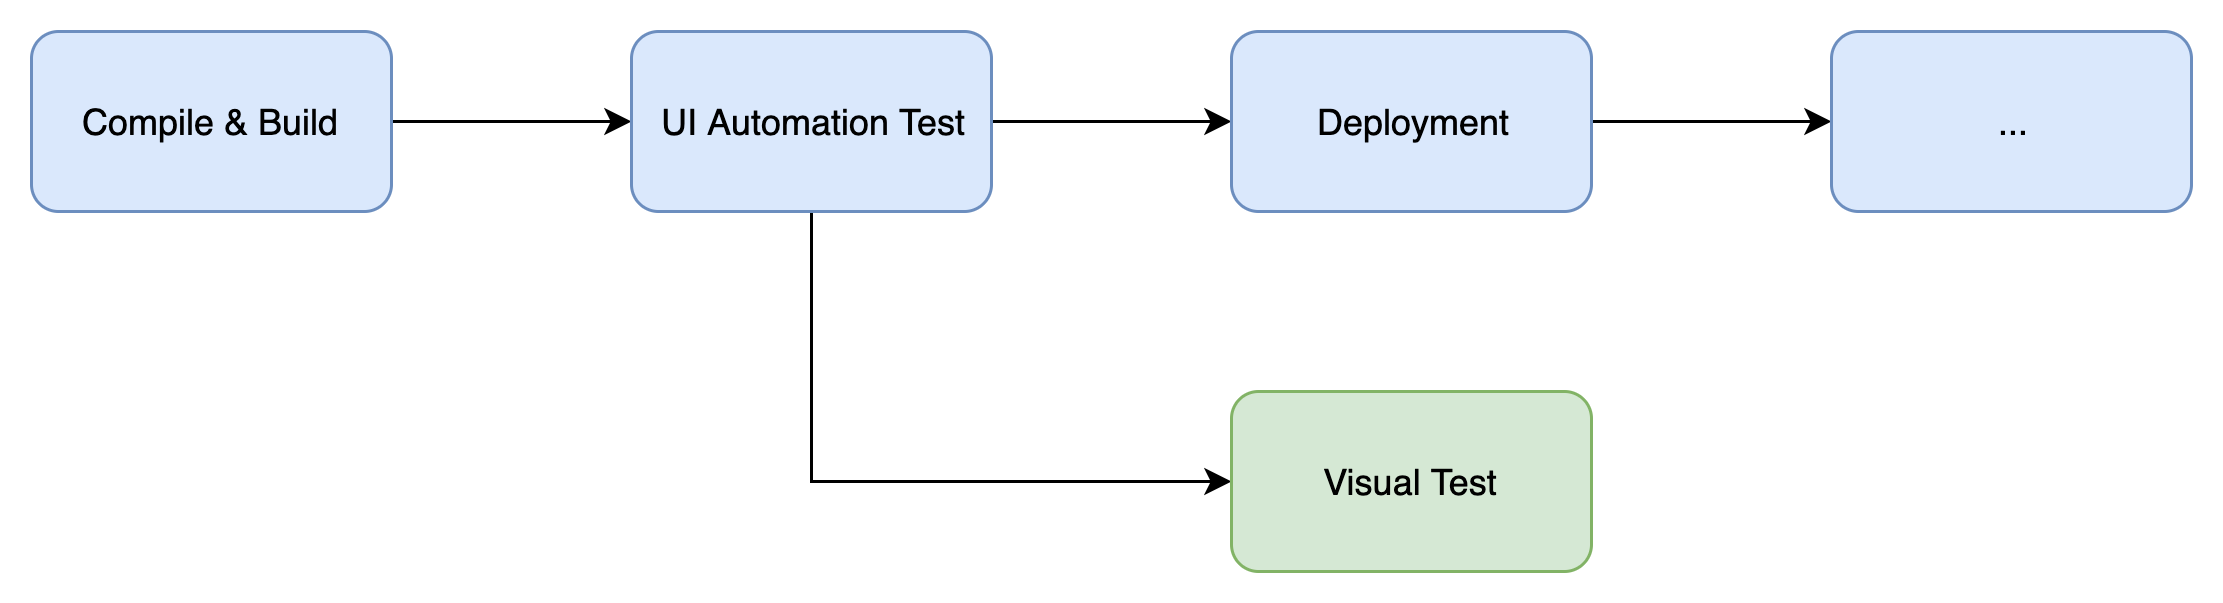
In the unsynchronized setup, once new code change passed the ui-automation-test, it would be deployed automatically, at the meanwhile, it triggers visual-test stage, if there is any mismatch, visual-test stage will fail but not impact deployment, and the mismatch need be checked separately.
This setup also brings high sensibility of the UI change, but loosen the UI check before deployment to provide higher stability.